Johan Driessen

Creating an SSH tunnel on a Mac

A while ago I wrote a post about how to set up an SSH tunnel to access remote desktop. Since then I’ve started using a Macbook Air, and naturally I want to do the same.

As it turns out, however, I’m terrible at remembering the syntax. So here it is, for my own future reference:

I want to access Remote Desktop on RDPSERVER, port 3389, and map it to port 3391 on my local machine. To to this I will connect to SSHSERVER and tunnel through that.

> ssh -l username -L localhost:3391:RDPSERVER:3389 SSHSERVER

Easy, peasy. Now I will never forget it again!

Updated Anti-XSRF Validation for ASP.NET MVC 4 RC

In our project, we’ve been using Phil Haack’s method for preventing cross-site request forgeries for JSON posts by inserting the request verification token as a header in the request, and then using a custom ValidateJsonAntiForgeryToken attribute to validate it. And it’s been working just fine.

However, with the recent release of ASP.NET 4 MVC RC, it didn’t work anymore. To my initial dismay, it didn’t even compile anymore. Turns out that the method, AntiForgery.Validate(HttpContextBase httpContext, string salt) , that hade been used to validate the tokens is now obsolete.

However, this turned out to be a good thing, as the MVC developers have made it easier to configure the anti-XSRF validation. You can now provide the tokens directly to the Validate method, and thus there is no need to create a wrapper for the HttpContext and the HttpRequest anymore.

Instead, you can just call the validate method with the proper tokens directly from your attribute:

1
2
3
4
5
6
7
8
9
10
11
12
13
14
15
16
17
18
[AttributeUsage(AttributeTargets.Method | AttributeTargets.Class,
AllowMultiple = false, Inherited = true)]
public sealed class ValidateJsonAntiForgeryTokenAttribute
: FilterAttribute, IAuthorizationFilter
{
public void OnAuthorization(AuthorizationContext filterContext)
{
if (filterContext == null)
{
throw new ArgumentNullException("filterContext");
}

var httpContext = filterContext.HttpContext;
var cookie = httpContext.Request.Cookies[AntiForgeryConfig.CookieName];
AntiForgery.Validate(cookie != null ? cookie.Value : null,
httpContext.Request.Headers["__RequestVerificationToken"]);
}
}

And, just to make this post complete, in case the original post is removed, this is the javascript required to add the header to the request:

1
2
3
4
5
6
7
8
9
10
11
12
13
14
15
16
17
postJsonWithVerificationToken: function (options) {
var token = $('input[name=""__RequestVerificationToken""]').val();
var headers = {};
headers['__RequestVerificationToken'] = token;

$.ajax({
cache: false,
dataType: 'json',
type: 'POST',
headers: headers,
data: options.jsonData,
contentType: 'application/json; charset=utf-8',
url: options.url,
success: options.onSuccess,
error: options.onError
});
}

Finally, you just use it as you would the standard ValidateAntiForgeryToken attribute, by decorating your action method like this:

1
2
3
4
[HttpPost, ValidateJsonAntiForgeryToken]
public ActionResult DoSomething(Foo foo) {
//Do something
}

And in your form, you just call Html.AntiForgeryToken(), just as you would for a normal form post.

A lot cleaner than the previous haack (although it was very clever)!

Setting up an SSH tunnel to access Remote Desktop using Putty and SSHD on Linux

In Approach, we have servers (ya, rly!). From time to time I need to access them. Usually, I do this by connecting to our VPN. At times, however, that is not possible, like for instance when some overzealous firewall administrator has blocked outgoing PPTP. Then you might have the need for an alternate approach, like using an SSH tunnel (provided that the administrator didn’t block outgoing SSH as well…)

And yes, I am aware that there are plenty of guides how to setup an SSH tunnel with Putty, but I found that they are either 1) overly verbose, 2) not exactly describing my problem or 3) wrong.

The situation

  • I want to access a Windows Server using Remote Desktop
  • There is a Linux server running in the same network section. Mine is running Ubuntu, so all examples will be in Ubuntuish.
  • I have a Windows 7 client machine, with the Putty ssh client

On the Linux server

  1. Make sure that SSH is installed (it probably is, otherwise, how do you access the server?). If not, $ sudo apt-get install ssh.
  2. Edit /etc/ssh/sshd_config.
    Check that it says AllowTcpForwarding yes somewhere. If not, add it.
  3. Reload sshd.

$ sudo /etc/init.d/sshd reload or
$ sudo service ssh reload depending on your Ubuntu version.

On the Windows client

  1. If you don’t have Putty yet, get it.
  2. Configure putty to connect to your Linux server using SSH 2.
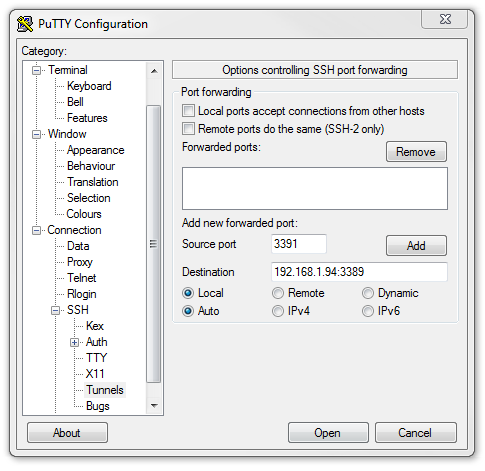
  3. Under Connection – SSH – Tunnels, map a local port to remote desktop on your Windows server. Usually, the remote port is 3389. The local port can be anything, except 3389 or 3390, which won’t work*.
    Configuration of SSH Tunnels in putty
  4. Save the session and connect to your linux server. You need to log on, and keep the connection open.
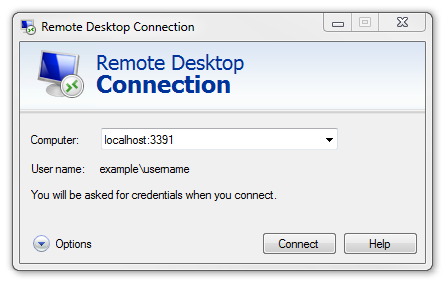
  5. Open a remote desktop session to the source port on localhost.
    Opening a new Remote Desktop connection
  6. Profit.

* Because 3389 is probably already running a RDP server, and 3390 is blocked in Windows 7 for some reason.

Pass phrase generator in Swedish

Some time ago, the XKCD comic had a strip (below) about why pass phrases makes a hell of a lot better passwords than the standard passwords that many systems force us to use. I really liked the idea, and tried to use phrases instead.

As it turns out though, it’s pretty hard to come up with random phrases on your own. They are not particularly random. Luckily, Jeff Preshing felt the same, and created passphra.se, where you can generate random pass phrases in English, Spanish or French. So I’ve been using that for a while.

But meanwhile, I was thinking “It would be neater to have this in Swedish”. And this weekend I finally managed to get away from doing other stuff long enough to create Lösenfras (Pass phrase).

First I had to find a suitable Swedish dictionary, that was free to use and downloadable. I found Den Stora Svenska Ordlistan with a CC license. I hacked together a small utility to extract just the words in json format, and found that it contained about 88 000 words. Awesome! Four random words from that dictionary gives you 60 quintillion permutations. That should be secure enough!

So then I created a small web page that loads all the words, and suggests four random words. Unfortunately, the phrases it suggested were not particularly easy to remember. How about rullgardinsmeny dagligdags vänsterextremistisk naturahushållning or valutareglering finnighet proletariat queerfeministisk? Yes, Swedish has a lot of compound words.

So after some fiddling around and a good suggestion from my illegitimate wife I decided to remove all personal named, words with other letters than a-z and åäö, and all words with more than two syllables, which in Swedish pretty much equals two vowels, since we don’t really have syllables with more than one vowel. That left me with about 24 000 words. Still a lot, gives 331 quadrillion permutations, and is gives a lot easier to remember phrases.

So, there it is. Lösenfras. Enjoy. I know I will!

lösenfras

One might wonder why I would write a post about a Swedish pass phrase generator in English. Well, I just couldn’t be bothered to make the lang property of my html tag dynamic. And any non-Swedish speaking readers are welcome to use the pass phrase generator of course, although I believe the phrases will be just a tiny bit harder for you to memorize…

Rånmord granhäck kod anslå.

Fixing the blog preview theme in Windows Live Writer

I’ve been using Windows Live Writer to write my blog post ever since I started blogging. Even though the 2011 update made it a little worse than before, it’s still a pretty nice tool to write your posts. Especially with the PreCode plugin that allows me to write code with support for SyntaxHighlighter.

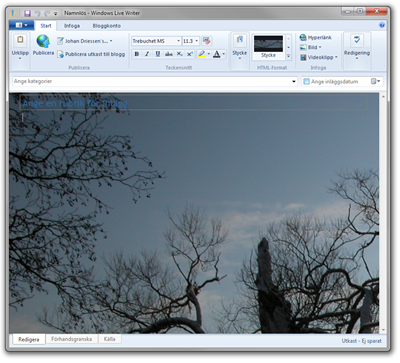
However, since I changed the theme of my blog recently, something went awry with the preview theme in Live Writer. More specifically, the white background for the blog posts disappeared, so it looked like this:

before

You’ll have to excuse the GUI being in Swedish, the computer I took the screenshot on came preinstalled with Swedish, and I although I’ve changed the system language to English, I’ve yet to find a way to change the language in Live Writer… Anyway, as you can see, it’s not optimal if you want to see what you’re writing.

I suppose I could change the Html of my blog, but there’s really nothing wrong with it, I would rather not change it just because Live Writer can’t interpret it correctly. Luckily, there’s another way. The theme files that Live Writer generates gets stored in C:\Users\{username}\AppData\Roaming\Windows Live Writer\blogtemplates. In this folder, there are some more folders with Guid-names. You just have to figure out which one is the correct one. In my case it’s easy, since I just have one blog setup.

Inside the Guid-named folder, you’ll find and index.html file, along with some images and other stuff. When I opened the index.htm file, it looked like this:

1
2
3
4
5
6
7
8
9
10
<!DOCTYPE html><!-- saved from url=(0025)/ -->

<HTML lang="en"><HEAD><TITLE>All posts -- Johan Driessen's blog</TITLE>
<META charset="utf-8">
<META content="IE=edge,chrome=1" http-equiv="X-UA-Compatible">
<META name="viewport" content="width=device-width, initial-scale=1.0"><LINK title="Johan Driessen's blog (RSS)" rel="alternate" type="application/rss+xml" href="/feed/rss/"><LINK title="Johan Driessen's blog (Atom)" rel="alternate" type="application/atom+xml" href="/feed/atom/"><LINK title="RSD" rel="EditURI" type="application/rsd+xml" href="/rsd.xml"><LINK rel="icon" type="image/gif" href="/favicon.ico"><LINK rel="stylesheet" type="text/css" href="file:///C:/Users/jdr1/AppData/Roaming/Windows Live Writer/blogtemplates/3bd255a5-c119-4680-b880-561c5d8efdbd/8e466ec1-3cf5-4403-8f5c-96137b8aa6d3/combined_92C867FD2A8F31A0C.css"><LINK rel="stylesheet" href="file:///C:/Users/jdr1/AppData/Roaming/Windows Live Writer/blogtemplates/3bd255a5-c119-4680-b880-561c5d8efdbd/8e466ec1-3cf5-4403-8f5c-96137b8aa6d3/SmallScreen.css">

<meta http-equiv="CONTENT-TYPE" content="text/html; utf-8"></HEAD>
<BODY>
<DIV id="container"><H1><A href="/">{post-title}</A></H1>{post-body}</DIV></BODY></HTML>

Aha, lots of elements missing around the post. So I changed the important part to this:

1
2
3
4
5
6
7
8
9
10
<DIV id="container">
<section id="main">
<article class="post">
<H1><A href="/">{post-title}</A></H1>
<section class="content">
{post-body}
</section>
</article>
</section>
</DIV>

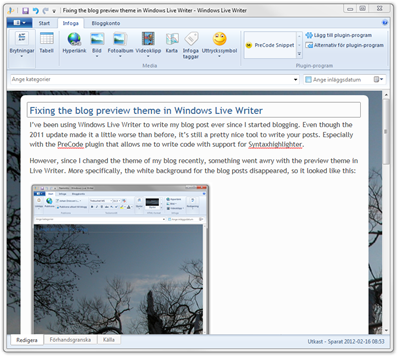
And after restarting Windows Live Writer, it looks like this instead:

after

Changing the html code in index.htm fixes the appearance of the Edit mode. In order to fix the appearance of the Preview mode, I had to change the index[1].htm file as well, but I just pasted the same html there, and everything looked as it should!

Repositories, can't live with them, can't live without them?

I always struggle with design. Systems design, that is, not graphical design (well, ok, that too…). One thing I never seem to be really happy with is Repositories. They often seem to be a lot of work, and never really seem to fit.

Once upon a time, I used to follow a strict chain of command in the design:
Controller –> Service –> Repository –> Database
This naturally led to quite a lot of useless service methods, that did nothing but forward the call to the repository. Does this seem familiar?

1
2
3
4
5
6
7
public List<Bar> GetBarList() {
return repository.GetBarList();
}

public void SaveFoo(Foo foo) {
repository.SaveFoo(foo);
}

Not particularly useful. So when I started working on this blog engine (Alpha) almost a year and a half ago, I made the bold choice to allow the controller to speak directly to the repository, as well as the service! If nothing else, it spared me from writing a few brain-dead methods. The downside was that the responsibilities became a little less clear.

I also tried to avoid repeating myself in the repositories by creating a base repository class (EntityRepository), and letting the specific repositories inherit from than and extend it if necessary. And by the way, I’m using RavenDB for Alpha, so Session is an instance of IDocumentSession. And IEntity just makes sure that the entities have an Id property. Anyway, it looked something like this (check out the Alpha source at revision dc0837bac57e for the real code):

1
2
3
4
5
6
7
8
9
10
11
12
13
14
15
16
17
18
19
20
21
22
23
24
25
26
27
28
29
30
31
32
33
34
public interface IEntityRepository<T> where T : IEntity
{
void Save(T entity);
T GetById(string id);
}

public abstract class EntityRepository<T> : IEntityRepository<T> where T: IEntity
{
//Ignoring how Session got there...

public virtual void Save(T entity)
{
Session.Store(entity);
Session.SaveChanges();
}

public virtual T GetById( string id )
{
return Session.Load<T>( id );
}
}

public interface IFooRepository : IEntityRepository<Foo>
{
Foo GetByBar(Bar bar);
}

public class FooRepository : EntityRepository<Foo>, IFooRepository
{
public Foo GetByBar(Bar bar)
{
return Session.Query<Post>().SingleOrDefault(x => x.Bar == bar);
}
}

Now, that’s a little bit nicer than writing the exact same code for every different entity. But we still have these repositories, that frankly doesn’t do much. They are just ceremony. Sure, they abstract away the actual persistence method, the interfaces could look the same if I used SQL Server. Except that they wouldn’t, since I would be using an int instead of a string for Id. And I have never ever had to change the data store in a project. And if I did, I would probably rewrite a lot of stuff. There’s really no point in abstracting away your data store, it only forces you to use the lowest common denominator.

So, what to do? Well, for now, I’m just getting the rid of the repositories. I’m letting the controllers access the IDocumentSession directly. Since querying RavenDB is more or less the same as querying a generic list, I feel pretty safe letting the controllers do that, at least for the simple stuff. The more complicated stuff I’m moving to the services. So it will basically be the same architecture as before, just without the repositories.

But that’s just the first step! After that, the services will have to go as well, in favor of intelligent queries and commands, in a more CQRS-ish way. I’m thinking something in line of what Rob Ashton outlined in a great blog post last summer. We’ll see how it goes.

So far I’ve managed to get rid of all Repositories except the PostRepository. I’d give it a week, tops, then it’s gone. So I guess you can live without them.

Disclaimer: I realize that there are scenarios where Repositories are useful. For example, in the project I’m currently getting paid to work on (unlike Alpha), we get our data from services, which we use WCF to communicate with. This means a lot of mapping between data contracts and entities, error handling and other fun stuff. In this case, the Repositories actually do stuff, and can be justified.

Getting Ruby on Rails 1.9.3 to work on Ubuntu 11.10

About a year ago, I wrote a post on how to get Ruby on Rails to work on Ubuntu 10.10. I’ve since updated it a bit. Today, after doing a clean install of Ubuntu 11.10, I tried to follow my own recipe to install Ruby on Rails, but as it turns out a few things have changed. No biggies, the recipe is still mostly valid, but I thought it might be a good idea to write a new post with updated instructions instead of just changing the old one.

Just as the last time, this is just what happened to work for me, I’m making no claims that this is the best, or even a good way to do it.

1 - Prerequisites

First of all, it’s a good idea to install some prerequisites, that will be needed anyway:

$ sudo apt-get install vim-gnome curl git git-core libxslt-dev libxml2-dev libsqlite3-dev

Technically, gvim (vim-gnome) is not a prerequisite, but it’s still nice to have! Some of these you might already have installed, in that case, congratulations.

2 - Install RVM

The first thing you want to do is to install the Ruby Versioning Manager, or RVM. I basically followed the instructions on the Installing RVM page, but these are the steps I took:

  1. $ bash -s stable < <(curl -s [https://raw.github.com/wayneeseguin/rvm/master/binscripts/rvm-installer](https://raw.github.com/wayneeseguin/rvm/master/binscripts/rvm-installer))
  2. Make some changes in .bashrc:
    Add to the end: [[ -s "$HOME/.rvm/scripts/rvm" ]] && source "$HOME/.rvm/scripts/rvm"
    Change the line that reads [ -z "$PS1" ] && return to if [[ -n "$PS1" ]] ; then
    Add before the row you added to the end (on it’s own row): fi
  3. Restart the terminal, or just run $ source "$HOME/.rvm/scripts/rvm
  4. Check that rvm works, run $ type rvm | head -1. You should get the result “RVM is a function”
  5. It might be a good idea to run $ rvm notes, just to make sure everything is fine and you haven’t missed anything so far.
3 - Install Ruby 1.9.3 with RVM
  1. $ rvm package install zlib
    $ rvm pkg install openssl
  2. Time to install Ruby 1.9.3!
    $ rvm install 1.9.3 --with-openssl=$HOME/.rvm/usr

Note: The openssl stuff is not needed for rails to work, but if you want to use Heroku to publish your stuff, you’ll need it, so might as well install it right away!
3. $ rvm --default use 1.9.3

4 - Install RubyGems

Dowload RubyGems from rubyforge.org and unzip it. Then run ~/rubygems-1.8.15$ ruby setup.rb.

5 - Install Rails

Ok, final step. Run $ gem install rails to install Rails. This takes a little while, but when it’s done everything should work. You can check that everything works by creating a new rails application in a directory of your choice: $ rails new test_app, or just jump to “The first application” chapter in the Rails Tutorial.

And yeah, some of these steps might not actually be necessary, or may break your computer. Also, these steps installs RVM, Ruby and Rails only for the current user, not system-wide.

Effortless unit testing with NCrunch for Visual Studio

I’ve been using a great little Visual Studio plugin lately, called NCrunch. It’s a continuous test runner, meaning that it finds and runs all my unit test in the background all the time. And whenever I change some code, it knows what tests (if any) are effected, and re-runs those tests. It also lets me see exactly what tests are covering a particular line of code. And I don’t even have to save my files for it to work!

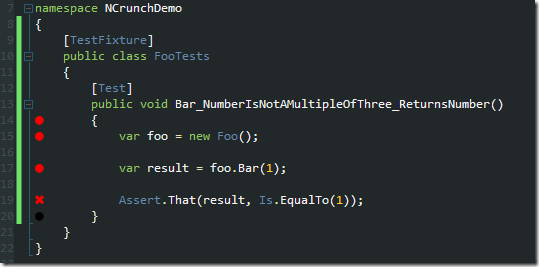
I’ll give you a small example. Say that I’m writing a class, let’s call it Foo, with a method, let’s call it Bar, that takes a number as a parameter, and if it is a multiple of three doubles it. Otherwise, it just returns it. Very useful. Anyway, I start by writing a test for the simple case of just returning a number.

Failing test

See the little red dots, and the x to the left? That’s NCrunch telling me that the test is being run, but is failing at line 19. What’s more, if I hover over the x, I get this helpful little box telling me why it failed:

Failed test hover

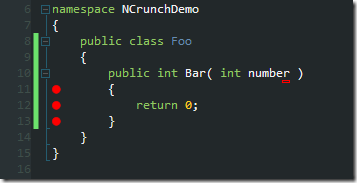
Ok, so the test is failing because Bar(1) is returning 0, instead of the expected 1. Let’s look at the method:

Bar returning 0

Aha, no wonder it’s returning 0! But look at those little red dots again! This time they show me that this code is, in fact, covered by tests, but unfortunately at least one of them are failing. If I click one of the red dots I can find out exactly what tests are failing (or not failing):

Failing coverage

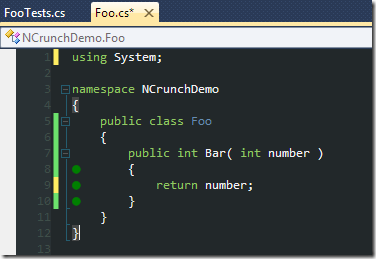
Ok then, let’s fix the failing test. Let’s return the number instead.

green coverage

The dots immediately turns green, indicating that this code is covered only by successful tests! And I didn’t even save the file first (as you can see by the asterisk). Awesome! Let’s look at the test again:

green test

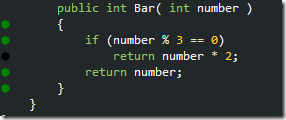
All green here as well! Great, let’s move on. Wasn’t the Bar method supposed to double the number when it was a multiple of three? Let’s add that code! (Yes, I know that you’re supposed to write the test first, but that’s kind of the point…)

black dot

Now I have a black dot! This means that this particular line is not covered by any tests at all! Bad TDD-Johan!

I think I’ll end my example there. I’ve been using NCrunch for a few weeks now, and I love it! It just makes the test running completely effortless. And whenever I have to back and refactor some old code it makes it very easy to find out what tests are covering it (if any). The only possible downside is that you do need a pretty fast computer for it to run, preferably a quad core.

Accessing an IIS Express site from a remote computer

Sometimes (waaaay to often) I have to check that a site I’m working on looks like it should in Internet Explorer 6, Safari on Mac or some other browser that I can’t run in Windows 7. In this case I wanted to access it from IE6 running in XP Mode. I could of course deploy it to IIS and make it publicly available, but since I’m now using IIS Express for running my sites from Visual Studio instead of the built-in web server Cassini, it almost simple to let other computers on my network access the site.

This post by Scott Hanselman almost describes how to do it, but since I had to make some adjustments I thought I might write a shorter post with just the steps you need for this.

1 – Bind your application to your public IP address

Normally when you run an application in IIS Express, it’s only accessible on http://localhost:[someport]. In order to access it from another machine, it needs to be bound to your public IP address as well. Open* D:\Users[YourName]\Documents\IISExpress\config\applicationhost.config *and find your site.

UPDATE FOR VISUAL STUDIO 2015: As was pointed out to me in a comment by Søren Nielsen, in Visual Studio 2015 the IIS Express configuration files have moved. They are now separate per project, and stored in /{project folder}/.vs/config/applicationhost.config. Which is much better, in my opinion, just don’t forget to add .vs/ to your .gitignore/.hgignore files!

You will find something like this:

1
2
3
4
5
6
7
8
<site name="Alpha.Web" id="2">
<application path="/">
<virtualDirectory path="/" physicalPath="C:\Users\Johan\HgReps\Alpha\Alpha.Web" />
</application>
<bindings>
<binding protocol="http" bindingInformation="*:58938:localhost" />
</bindings>
</site>

In <bindings>, add another row:

<binding protocol="http" bindingInformation="*:58938:192.168.1.42" /> (But with your IP, and port number, of course)

2 - Allow incoming connections

If you’re running Windows 7, pretty much all incoming connections are locked down, so you need to specifically allow incoming connections to your application. First, start an administrative command prompt. Second, run these commands, replacing 192.168.1.42:58938 with whatever IP and port you are using:

> netsh http add urlacl url=http://192.168.1.42:58938/ user=everyone

This just tells http.sys that it’s ok to talk to this url.

> netsh advfirewall firewall add rule name="IISExpressWeb" dir=in protocol=tcp localport=58938 profile=private remoteip=localsubnet action=allow

This adds a rule in the Windows Firewall, allowing incoming connections to port 58938 for computers on your local subnet.

And there you go, you can now press Ctrl-F5 in Visual Studio, and browse you site from another computer!

Getting the Firefox button back in Ubuntu 11.04 with Unity

Since I’ve been trying to learn more about Ruby on Rails (everybody else seems to be doing it, so why shouldn’t I?) lately, I’ve been spending quite some time in Ubuntu instead of my usual Windows 7 environment. And since that’s the way I do things, I immediately upgraded to 11.04 when it was released.

With Ubuntu 11.04 you get Unity instead of Gnome, which is pretty cool. I generally like it, especially the fact that you can, just like I do in Win7, just press the Windows key and type a few letters to start a program instead of having to find it in the menu. A new feature that I’m not so impressed with, though, is the fact that they have moved the menus up to the top, instead of having them in the application windows, just like in Mac OS. I mostly find it confusing (it’s just way to easy to have focus on the wrong window and using the wrong menu – no usability there) and unnecessary, but I suppose I can live with it.

Except in Firefox 4. I’ve been using it since the early betas, and I’ve just recently gotten used to, and actually started liking, the Firefox button with the combined menu. And bam - the old menus are back in Unity!

Luckily, it turns out there’s an easy way to restore law and order to the galaxy:

$ sudo apt-get remove firefox-globalmenu

And just like that, the Firefox button is back, and the menus in the top bar are gone!