The other week I was setting up FreshRSS as a replacement for Inoreader that I have been using for years. Inoreader works fine, but like many other companies they are trying to integrate lots of AI crap nowadays, and I just down want that in an RSS aggregator! So I thought it was time to try something self-hosted, and FreshRSS seemed to tick every box.
Anyway, this post is not about FreshRSS[1], but rather how I solved a Docker problem that I’m sure I’ve run into several times before. I am writing these words in the hope that next time, I’ll remember to read my own blog instead of searching on the Interwebs for at least two hours…
I was going to install FreshRSS on a Hetzner virtual server running Ubuntu 22.04, and since that server runs some other stuff as well, I decided that it would be easiest to run FreshRSS in a docker container. So I followed the instructions at https://github.com/FreshRSS/FreshRSS/tree/edge/Docker#readme. Everything worked fine, I could even import all my feeds from Inoreader - except that my docker container could not download any RSS Feeds.
So yeah, it seems that by default Docker on Ubuntu[2] does not allow containers to access the outside network at all. After following a lot of false leads I finally determined that all you have to do is to add "iptables": true to /etc/docker/daemon.json. So after changing this, my daemon.json now looks like this:
I’m no expert on Linux networking, even though I’ve been using Linux since 1998 or so, and even run publicly available servers since 2000, so I’m not going to explain exactly why this is needed. But from my understanding, settings iptables to true in the config files makes Docker set up the required iptables rules on startup, and that fixes the outbound connectivity.
Now all I need to do is remember this for next time. Well, fingers crossed…
1.Although I will say that FreshRSS seems to work splendidly. I have been using it exclusively for about two weeks now, and it's really great! I strongly recommend it if you don't mind hosting your own RSS aggregator! ↩
2.This at least seams to be true for Ubuntu 22.04 and 24.04, I haven't verified it on anything else. ↩
I use Dropbox heavily, both for personal files, and for work files. So I have a personal account, and I also have a work account. I am also what you might call an Operating System Agnostic, that is I use Windows, Mac OS and Linux pretty much equally.
Now, for some reason the Dropbox client for Linux doesn’t have support for multiple accounts at all. In fact, the Linux Dropbox client seems all but forgotten. This is obviously a problem for me. Now, this isn’t new to any one I suppose, but I think I figured out a pretty good way of handling it, so that once it’s set up I can just forget about it.
My method is to use the standard client for my personal account and Docker for my work account (vice versa would of course work equally well). I use the Dropbox Docker Image created by otherguy. There might very well be other dropbox images that work better, I have no idea, but this one does the job for me.
I recently had to set this up for maybe the third time, so I figured it was time to document it, hence this post.
First, I created a docker compose file, compose.yaml:
The DROPBOX_UIDand DROPBOX_GID should match the userid and groupid of your user, but in most single-user linux systems it will be 1000, and you should of course use the appropriate time zone for your location. Other than that, the only interesting thing is where to map the volume to. Since the /opt/dropbox volume of this container not only contains your actual dropbox, but a number of other files as well, I found it to be best to map it to a hidden folder, and the symlink my actual Dropbox folder later.
After this, start the container, and start following the logs:
1 2
> docker compose up -d > docker logs -f dropbox
The reason why you have to follow the logs is that the container will print a URL that you have to use to connect it to your dropbox account. It will look something like this:
1 2
This computer isn't linked to any Dropbox account ... Please visit https://www.dropbox.com/cli_link_nonce?nonce=768d09d7-c6b9-4574-8aad-7a8d41fa9728
Just paste this link into your favourite web browser, log in to Dropbox and just like that, the syncing will start.
If you want to exclude some folders from syncing, you have to use the command line inside the container. For an overview of all the commands, use
You have to start with the name of your dropbox, I have no idea why, but it’s the same as the folder name in the file system (directly below the hidden folder, in my case .dropbox-approach).
The only thing remaining is to symlink it in your home folder:
This is a guest post from my colleague Staffan Rydergård.
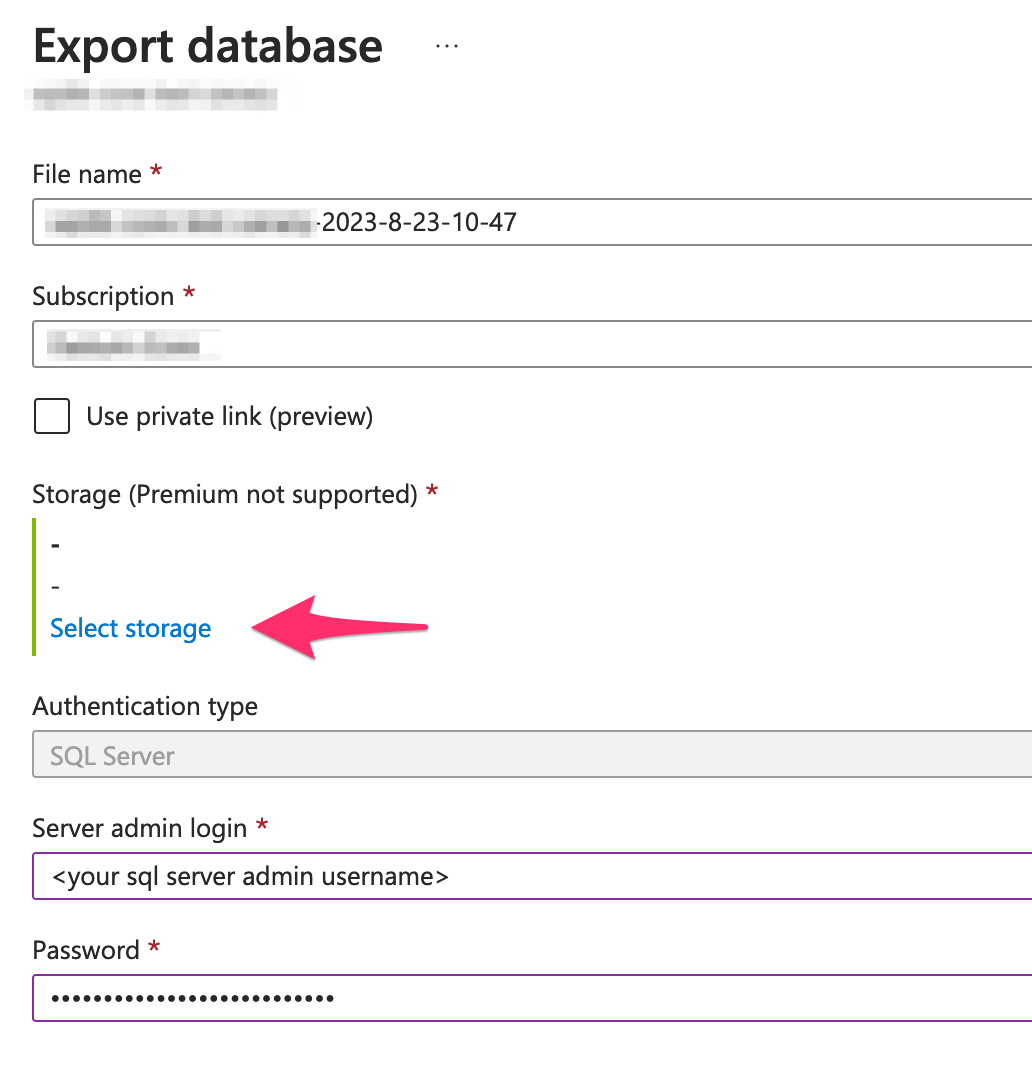
Export your Azure SQL database
In Azure Portal, navigate to your SQL database and select Overview -> Export
Select an existing Storage account and Container as target location for your exported database.
Fill in your SQL Server credentials and then click on OK. Azure portal will start an export task in the background and notify when the export is done.
Import the database on your local SQL server
Using e.g. Microsoft Azure Storage Explorer connect to your storage account download the newly created .bacpac file from the container you selected earlier.
Open Azure Data Studio and view Extensions. Search for “SQL Server Dacpac” from Microsoft and install the extension.
Connect to your local SQL server and right click on the Databases folder.
Select Data-tier Application Wizard.
In the wizard, select the option “Create a database from a .bacpac file [Import Bacpac]” and select the downloaded .bacpac file and name the target database you would like to create.
Finishing touches
If you are using a dedicated login to access your database from your code then you need to create a user in the imported database for that login. Right click on the imported database and select “New Query”. If your login user name is e.g. “devuser” run the following statements to add the user and assign the db_owner role to that user.
1 2
CREATEUSER devuser FROM LOGIN devuser; EXEC sp_addrolemember 'db_owner', 'devuser';
So, yeah, I also joined that elephant-network, Mastodon. You can find me at mastodon.social/@nahojd. Beacause, you know, I want to be where it happens.
I’ve come to realise that not everyone has the same experience of Twitter that I have, mostly beacuse I’m using the Flamingo client for Android, which means I have a strictly chronological flow, consisting only of accounts that I follow, and no ads. So I’m keeping my Twitter account for the forseable future, or until they cut 3rd party API access completely!
This blog has been using Google Analytics (GA) to track visitors[1] since pretty much the beginning. Mostly because it’s free, and I knew how to use it since I’ve been using it professionally for clients since forever. But I haven’t really felt good about it for some time, for two primary reasons:
I see no reason whatsoever in providing Google with data about my visitors.
It’s really not that good anymore. GA is very focused on e-commerce, and simple not suited for this task anymore.
So when I read about the recent Schrems II ruling in Austria, where they find that Google Analytics is now probably[2] illegal i the EU, I thought it was time for a change! The only question then, is what to use instead!
One obvious option was to simply remove the GA tracking script and not replace it at all, instead just relying in the server logs. To be honest, that would probably be enough for my purposes, even if I would lose some information about browser capabilities, screen sizes and such. But there are other sites where I also would like to replace GA, where that wouldn’t be enough, so I though I’d better find a better alternative.
There are, of course, numerous alternatives, at least if you’re willing to pay. If I was doing this for a client, I wouldn’t have a problem with that. But for this blog, where I write the occasional post and definitely don’t make any money, I’d prefer it if it was free. I also wouldn’t mind hosting the tracking service myself, as that would pretty much guarantee that the data doesn’t fall into the wrong hands.
So after a bit of research, I decided on Matomo Analytics, which can be installed on-premise, but also has a cloud hosting solution. It also has a lot of plugins, and even lets me import my old data from Google Analytics!
Matomo has pretty good documentation, with nice guide on how to install it on a server, but I decided to use a Docker container instead, since there is an official image from Matomo on docker hub. Matomo also needs a MySQL or MariaDB database to store the data in, and to be honest I had some problems getting Matomo in the container to talk to the database.
In the end I installed MariaDB from the official docker image as well, as it seemed easier to get the Matomo container talking to the database in another container, than to the db on the host system.
If it is of any help to someone else trying this, I installed the images like this, although you should probably create a persistent volume for mariadb as well, if you have to reinstall it:
I then inspected the mariadb container to find out what IP address it was using (it was 172.17.0.3!), and used that when connecting from Matomo. Oh yeah, I also attached to bash in the mariadb container and created and database and a database user for Matomo to use before setting up Matomo.
And that, I think, was it! Now it’s just a matter of seeing if it works properly!
1.Nothing nefarious, I swear! I just want to be able to see which posts are getting read, what browsers and operations systems you are using and that stuff. ↩
2.When it comes to law, EU and GDPR, it is always probably... ↩
This is somewhat a follow up to my previous post Calling the Swish Payment API from Azure AppService, although it is not about Swish at all. It is, however, about certificates in Azure. It is also way too long, if you’re the impatient type, I’ve added a TL;DR
Today, I was implementing authentication and signing with BankID, a popular electronic identification system in Sweden[1], for a client. I was using a library called Active Login[2], which makes it a whole lot easier to implement. That is not really relevant to this post, though. What is relevant is that in order to call the BankID API, you need to use a certificate issued by your bank.
I had previously only worked with private certificates in Azure in Windows-based App Services. This time, however, we’re using Linux-based App Services. I had foolishly assumed that loading certificates in them would work the same way, since we’re still using a dotnet core application. Obviously, this turned out to be a false assumption[3].
When you want to use private certificates in Azure, you probably don’t want to include them with your code[4]. Instead you upload them to your App Service, either using the Azure Portal, or using the command line[5].
In a Windows-based App Service, when you upload private certificates to your app service, they end up in the Certificates Store, more specifically in the Personal Certificates store for the CurrentUser. They can then be loaded with these few lines of code:
1 2 3
var certStore = new X509Store(StoreName.My, StoreLocation.CurrentUser); certStore.Open(OpenFlags.ReadWrite); var certs = certStore.Certificates.Find(X509FindType.FindByThumbprint, "THUMBPRINT OF CERTIFICATE", false);
This, however does not work in Linux. Correction: it does not work in a Linux-based App Service[6], because there is no certificate store in Linux (not in the Windows way, at least). But wait, you say, you can still upload certificates through the Azure Portal in a Linux-based App Service! Where do they end up? Have no fear, child, that is what I am here to tell you!
If you, or rather I, had bothered to read the documentation, I, or perhaps you, would have found a page called Use SSL cert in code, and maybe even the heading “Load certificate in Linux/Windows containers”. Here, it clearly states that private certificates in Linux containers[7] are stored in /var/ssl/private, as long as you remember to set the environment variable WEBSITE_LOAD_CERTIFICATES to the thumbprint of your certificate (or * to load all of them).
Alright, so I opened a SSH session to my App Service, and typed in ls /var/ssl/private. Nothing. In fact, the directory did not even exist. Fortunately, my many hours of banging my head against the Swish implementation bare fruit, and I suddenly remembered that changes to the certificates often does not apply unless you stop and start the App Service. Restart is not enough, you have to Stop it! And then start it again. I checked again, and heureka! My certificate was there! In form of a name called THUMBPRINTINCAPITALLETTERS.p12[8].
So, to answer the question that I may have promised to answer by naming this post “Loading private certificates from a Dotnet Core app in an Azure Linux App Service”:
You just load the file. They are not even encrypted anymore, so you don’t need a password:
1
var cert = new X509Certificate2("/var/ssl/private/THUMBPRINTINCAPITALLETTERS.p12");
So there. Easy, peasy!
Wow, I did not expect this post to be this long. I’d better add a TLDR. I obviously find writing way to fun. Also, I may have broken my previous number-of-footnotes-record!
TL;DR
Private certificates in Linux-based App Services are stored in /var/ssl/private and named as their thumbprint.p12.
In order to load them from code, you can just pass the path to the constructor of X509Certificate2. It is not password protected.
1.In fact, it is so popular that it is the de facto standard. Many therefore assume that it is governement run, but in reality it is run by the largest banks in Sweden! ↩
2.Active Login is created by Active Solution, which is actually a previous employer of mine! ↩
3.Otherwise, I would probably not have written this blog post. ↩
4.You also do not want to include api keys and passwords in your code, unless you want to be embarrassed on Twitter! ↩
5.Or so I am told. I have not tried it. Uploading certificates seems to be something I do quite rarely, so I have not really felt the need to automate it. ↩
6.As it turns out, you can use the certificate store in dotnet core running in Linux, you just have to add the certificates in code. Also, the cert store is internal to dotnet core, and I assume that is basically just there for Windows compatibility. You can read a lot more about it in the App Service documentation. ↩
7.Which I guess is that Linux based App Services really are... ↩
8.It was not actually called THUMBPRINTINCAPITALLETTERS.p12, but I hope you get the point. I do, however, find it funny that you MAY NOT upload a certificate with the .p12 extension, it HAS TO BE .pfx, but after you uploaded it, it gets saved as .p12 anyway. ↩
So, there I was trying to run some command in Azure Powershell, when suddenly I was greeted with the following error:
> Some-Az-Action-That-Is-None-Of-Your-Business
Your Azure credentials have not been set up or have expired, please
run Connect-AzAccount to set up your Azure credentials.
Alright, I thought, maybe by credentials actually have expired, better do what it says!
> Connect-AzAccount
WARNING: To sign in, use a web browser to open the page
https://microsoft.com/devicelogin and enter the code DVS4FGXQR to authenticate.
Said, and done, surely it will work now!?
> Some-Az-Action-That-Is-None-Of-Your-Business
No tenant found in the context. Please ensure that the credentials you provided
are authorized to access an Azure subscription, then run Connect-AzAccount to login.
Now, this is weird. I’m, pretty sure I just signed in with the correct Azure account. What just happened?
Hey, that’s not correct! Where is my subscription and my tenant? This is getting curiouser and curiouser! I will spare you a couple of rounds of trying to sign in with different accounts, trying to manually set the tenant and duckduckgoing the shit out of this. Suffice to say that in the end it seems this is something that happens, your Azure Context becomes corrupted in some way. Fortunately, there is an easy way to fix it:
1 2
> Clear-AzContext > Connect-AzAccount
Simply clear the Azure context and re-connect, and it should all start working again. Now, if you run Get-AzContext again you will hopefully see something more like this:
Name Account SubscriptionName Environment TenantId
---- ------- ---------------- ----------- --------
Betala per användning (0058c7f9-344f-4d… jd@approa… Betala pe… AzureCloud 77eb242d…
Weirdly enough, this happened to me on two different computers, just two days apart. It didn’t take nearly as long to fix it the second time, but at least it made me write this blog post!
For the last couple of months, I’ve been working on a new version of a site for a client that uses Swish for payments. This new version will be hosted as an Azure App Service. The Swish API is pretty nice and straight forward, but for some reason they have implemented authentication and security using client certificates instead of something like OAuth 2. This makes it a bit more difficult, especially in Azure, since neither the server certificate for the API or the client certificates are signed by trusted authorities.
In fact, during my research[1] I found many claims that it simply does not work, that you have to use a virtual machine in order to make the calls to the Swish API work. However, I also this answer on Stack Overflow that claimed that the trick was simply to upload all certificates to Azure, and this turned out to be true.
So, in order to remember this for the next time, and hopefully help anyone else with the same problem, I decided to write a more comprehensive guide on how to get this working.
1. Download the simulator certificates
All examples will be based on the Swish Test Merchant certificates, which can be downloaded from the Swish developer page (click View Guide in the Simulator Guide box[2]). Extract the downloaded file and locate the file named Swish_Merchant_TestCertificate_1234679304.p12 (or whatever they may have changed it to), and change the extension to pfx, since that is the extension that Azure will expect later[3].
2. Extract all the root certificates from the .p12/.pfx file
The .pfx file contains the whole certificate chain, and when working on a Windows machine, it will be enough to install that to your CurrentUser och LocalMachine store (depending on how you run your application), but in Azure you will need to upload all certificates separately. It is therefore necessary to extract the certificates from the file. This can be done in a number of different ways. If you are working on a Windows machine, you could just install the certificate, and then go into the certificate store and export the resulting certificates.
However, you can also do it from the command line with openssl. Now, I’m no expert on openssl, and I’m sure there is a better way to do this, this answer on the Unix & Linux StackExchange for example suggests piping the result through sed, but we’re only doing this once, so this works good enough.
First, list the certs in .pfx file and send the results to a text file[4].
Then, open the text file in a text editor, and locate the two last certificates (the first one is your actual client certificate, you can ignore that for now). Now, copy everything from and including -----BEGIN CERTIFICATE----- to (and still including) -----END CERTIFICATE----- and paste it to a new file called Swedbank_Customer_CA1_v1_for_Swish_Test.cer, which should then look like this:
Repeat for the second certificate, but call the file Swedbank_Root_CA_v2_for_Swish_Test.cer.
Upload the certificates to Azure and configure your App Service
Now you need to upload the certificates to you App Service in Azure. Log in to your Azure Portal and navigate to TLS/SSL settings in you App Service. Click on the Private Key Certificates (.pfx) tab, and then on Upload Certificate.
Select the Swish_Merchant_TestCertificate_1234679304.pfx file[5] and enter the password (which is just swish for the simulator certificate). Click Upload and you should see the certificate in the Private Key Certificates list. If you do this right now, you will also get a warning that the certificate is about to expire, which is true, but there is no newer certs yet, so we’ll just have to repeat this process in a month or two.
Update 2020-05-15
New certificates for the Swish sandbox finally arrived (mss_test_1.8.1)! I have verified that this exact same procedure works for them as well. However, they are now issued by Nordea rather than Swedbank, so it would make sense to call the certicates something with Nordea instead! :-)
Make sure to change the thumbprints as well!
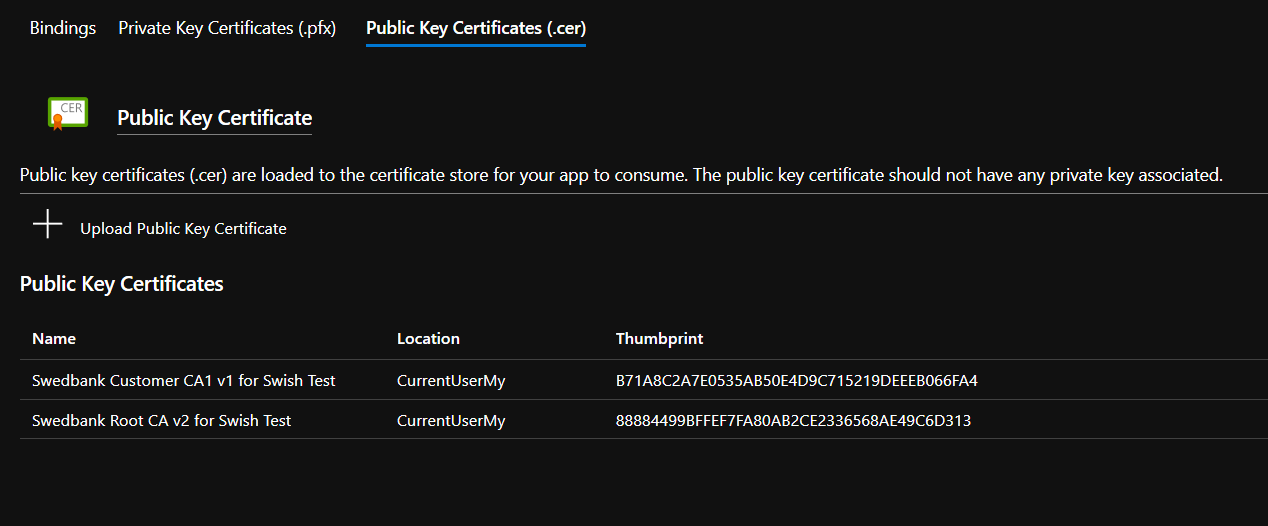
Next, you need to upload the public CA certs that you extracted earlier. Click on the Public Key Certificates (.cer) tab, and then on Upload Public Key Certificate. Select the Swedbank_Customer_CA1_v1_for_Swish_Test.cer file, and give it a name, something like Swedbank Customer CA1 v1 for Swish Test maybe? Click Upload and to the same for the other certificate.
In order for you App Service to be able to access the certificates, you need to set the environment variable WEBSITE_LOAD_CERTIFICATES. The value should be either * if you want to load all certificates, or a comma separated list of thumbprints if you want to limit which certificates that are available to your application. So go to Configuration -> Application settings and click New application setting to add the setting.
NOTE: If you have multiple slots in your App Service, you have to do this for all slots!
In order to make sure that the certificates are uploaded correctly, and available to your application, you can use the debug console. Go to Advanced Tools (under the Development Tools heading), ang click Go to open it in a new window. Select Debug Console -> PowerShell in the top menu.
1 2 3 4 5 6 7 8 9 10 11 12 13 14
Kudu Remote Execution Console Type 'exit' then hit 'enter' to get a new powershell process. Type 'cls' to clear the console
PS D:\home> dir cert:/CurrentUser/my dir cert:/CurrentUser/my
Thumbprint Subject ---------- ------- B71A8C2A7E0535AB50E4D9C715219DEEEB066FA4 C=SE, O=Swedbank AB (publ), SERIAL... 88884499BFFEF7FA80AB2CE2336568AE49C6D313 C=SE, O=Swedbank AB (publ), SERIAL... 76B6E2CB1BBA1BBC8A0C276AEF882B16AC48E7E0 CN=1233782570, O=5564010055, C=SE
You should be able to see all the certificates you have uploaded here. Take note of the thumbprints, you will need them shortly!
Use the client certificates when connecting to the Swish REST API
These examples will use the HttpClient in dotnet core 3.1, because that is what I’ve been using. What we need to do is create our HttpClient with a custom HttpClientHandler that includes all the client certificates. This also lets us handle the validation failure that will occur for the server certificate, since it is not signed by a trusted authority.
The first step is to load all the certificates. You will need to pass all the thumbprints, both for your private client certificate and for the public certs you extracted.
1 2 3 4 5 6 7 8 9 10 11 12 13 14
public X509Certificate2Collection GetCertificates(string[] thumbprints) { var certStore = new X509Store(StoreName.My, "CurrentUser"); certStore.Open(OpenFlags.ReadOnly);
var certificates = new X509Certificate2Collection();
foreach(var thumbprint in thumbprints) { var certs = certStore.Certificates.Find(X509FindType.FindByThumbprint, thumbprint, false); certificates.AddRange(certs); }
return certificates; }
The next step is to create our HttpClient with the custom HttpClientHandler:
public HttpClient CreateClient() { var handler = new HttpClientHandler() { //The server certificate is not signed by a trusted authority, //so we need to override the validation ServerCertificateCustomValidationCallback = (sender, certificate, chain, sslPolicyErrors) => { //If you want to, you can check that the server certificate //thumbprint matches the expected. However, just recently they //changed the certificate without notifying anyone, so this //may cause problems. You could also just return true and be done with it. var match = certificate?.Thumbprint == serverCertThumbprint; return match; } };
var clientCerts = GetCertficates(/* Pass your array of thumbprints here */); foreach (var cert in clientCerts) { handler.ClientCertificates.Add(cert); }
returnnew HttpClient(handler); }
And that should be it! Unless I forgot something. If you follow this guide, and still have problems, please comment below, and I will try to update the guide. I do have it working now, so I should be able to figure out the problem!
About a year ago, I bought an Amiga 600. It did not have a hard drive, but all Amiga 600 have an IDE port, and you can use a Compact Flash card with a CF-IDE adapter as a hard drive. That worked fine, and I could install Workbench on the CF card, and use it. But eventually I though I should try to use WHDLoad, so that I could run more games directly from the hard drive. I found a video by Nostalgia Nerd on Youtube, where he goes through the process of installing Classic Workbench and WHDLoad on a Compact Flash card, unfortunately this video is (currently) four years old, and also very… quick? With the help of the comments[1] and some trial and error, I managed to get it working, though.
Now, recently I was generously given an Amiga 1200. This one actually had a hard drive, but who knows how long that will keep on working, so I though I’d replace it with a Compact Flash card as well. This time, however, for the benefits of my readers[2] I thought I’d write down the process in a blog post. I thought it might be useful because a) I prefer written instructions, and b) it would give me a chance to update and correct the instructions so that they actually work.
I won’t go into the hardware side of this, because there’s really nothing to it. But you will need a Compact Flash card with a capacity of at least 4GB, some kind of CF-IDE adapter (not neccessarily that one) and of course a Compact Flash reader for your computer. This tutorial also assumes that you are running Windows, although it should be possible to use pretty much the same procedure with FS-UAE on Linux or Mac.
Step 1 - Download stuff
First of all, you will need to download a bunch of software.
WinUAE - Amiga emulator
This tutorial uses the WinUAE amiga emulator, which can be found on winuae.net. I was using version 4.0.1, although I now see that version 4.3.0 is available. From what I can tell, the difference seems to be very minor, so it shouldn’t matter.
Kickstart / Workbench
You will need a copy of the Kickstart ROM and Workbench disk images, version 3.0 or 3.1. This is still under copyright, and at least the Workbench images can be bought from amigaforever.com. They can also be found on several places on the Internet, as usual DuckDuckGo is your friend.
PFS3 File System support
You probably want to use the PFS3 file system, and you will need to download the handler for that from http://aminet.net/package/disk/misc/pfs3aio. This is not strictly necessary, but it’s faster than the standard AFFS and supports larger partitions.
Classic WB
Hard disk images for Classic WB can be found at classicwb.abime.net. I used the LITE version for the Amiga 1200, but for an Amiga 600 you probably want the 68K version.
The original tutorial suggested that game packs could be downloaded from http://kg.whdownload.com/kgwhd/, but that doesn’t seem to work anymore. I downloaded both games and demo packs from ftp://grandis.nu/Commodore_Amiga/Retroplay/, but they are available from many more places, just search for whdload games pack.
Put everything in a folder somewhere on your PC.
Step 2 - Clean the CF card
In order to use the Compact Flash card in an Amiga, you need to remove all previous file system information from it. In order to do this, run diskpart in an Administrative command prompt.
First, list your disk by entering list disk. This should give you a result something like this:
Next, select your compact flash card, in my case it’s disk 6: select disk 6. Be very, very sure that you select the correct disk. You will destroy everything on it.
If you want to be completely sure that you have selected the correct disk, you can run detail disk just to verify. When you are 100% sure, run clean. This completely wipes the file system information from the disk, making it ready to use in the Amiga. exit diskpart.
Step 3 - Configure virtual Amiga in WinUAE
Start WinUAE as Administrator. Now we need to configure the system, and make it a little faster than a real Amiga. Otherwise this process will take literally[3] forever.
CPU and FPU
CPU: 68040 (or maybe 68060) / JIT
FPU: CPU Internal / More Compatible
CPU Emulation speed: Fastest possible
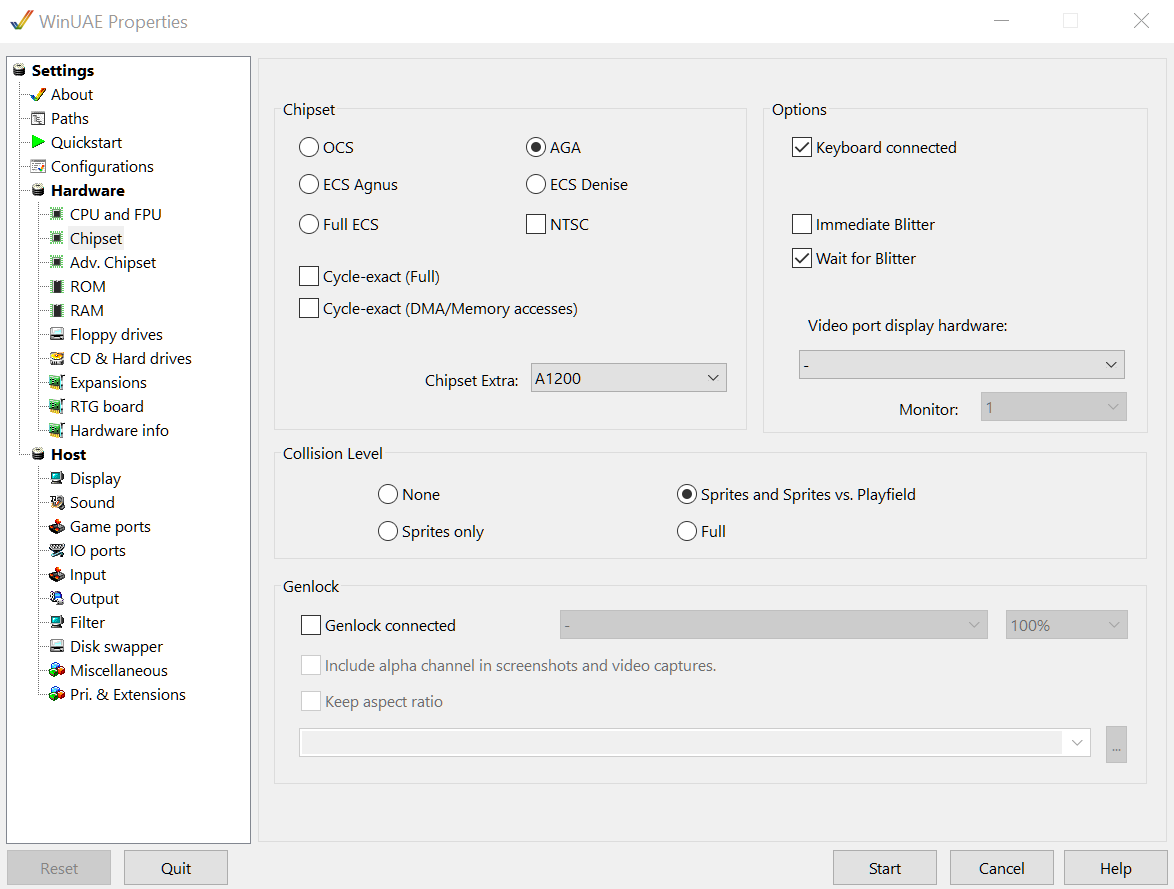
Chipset
Uncheck cycle exact, otherwise leave the default values.
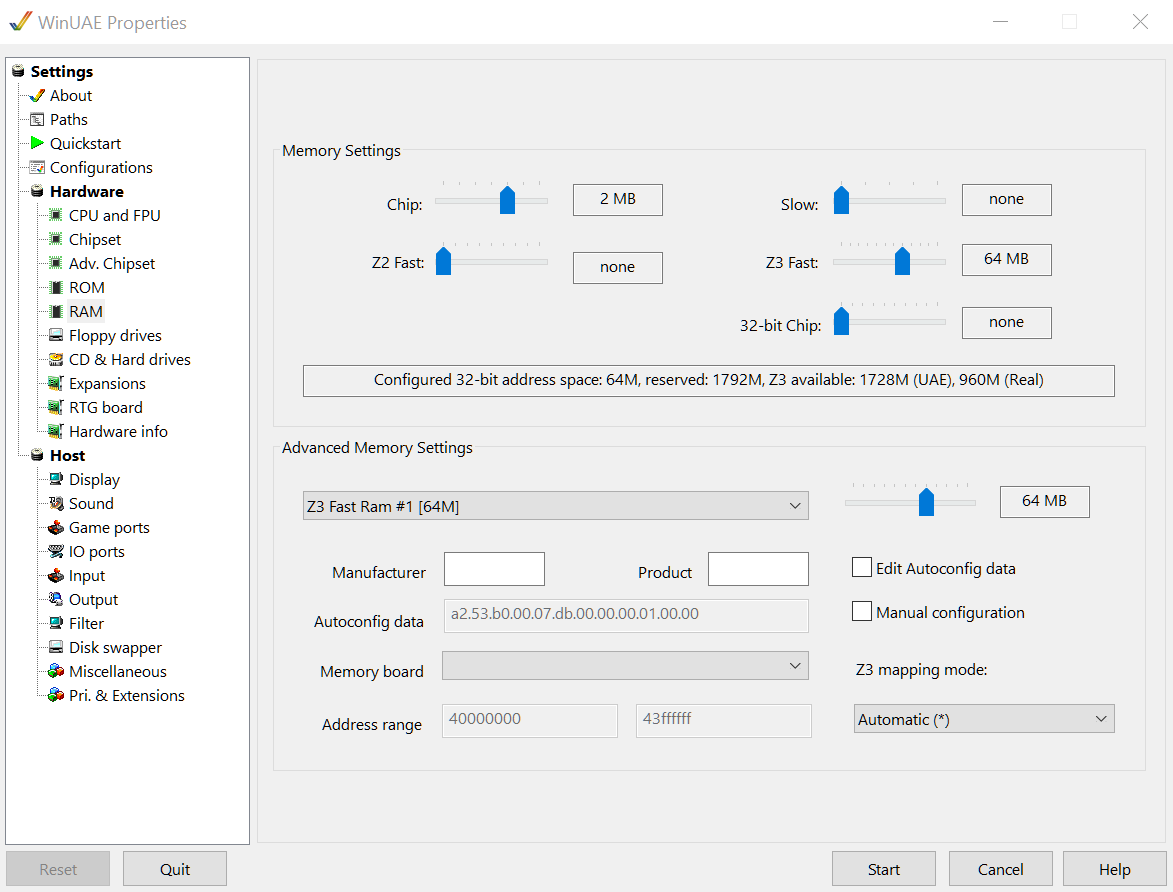
RAM
Add some Z3 Fast RAM, I used 64 MB, just as in the original video.
ROM
Use the appropriate Kickstart ROM (probably the same as in your amiga). It needs to be version 3.0 or 3.1.
Floppy drives
Add the Workbench installer disk image to DF0:. It should not be write protected (use a copy if you don’t want to risk modifying your original image).
Hard drive (Compact Flash, really)
Now you need to add your compact flash card as a file system, as well as the pfs3 handler. Enter the CD & Hard drives section.
Add the pfs3aio archive as device f
If you want to use the PFS3 file system (which is recommended), you need to mount the archive with the handler as a file system as well:
Click “Add Directory or Archive”
Select “Archive or plain file”
Select pfs3aio.lha
Device name: f
Add the Compact Flash card
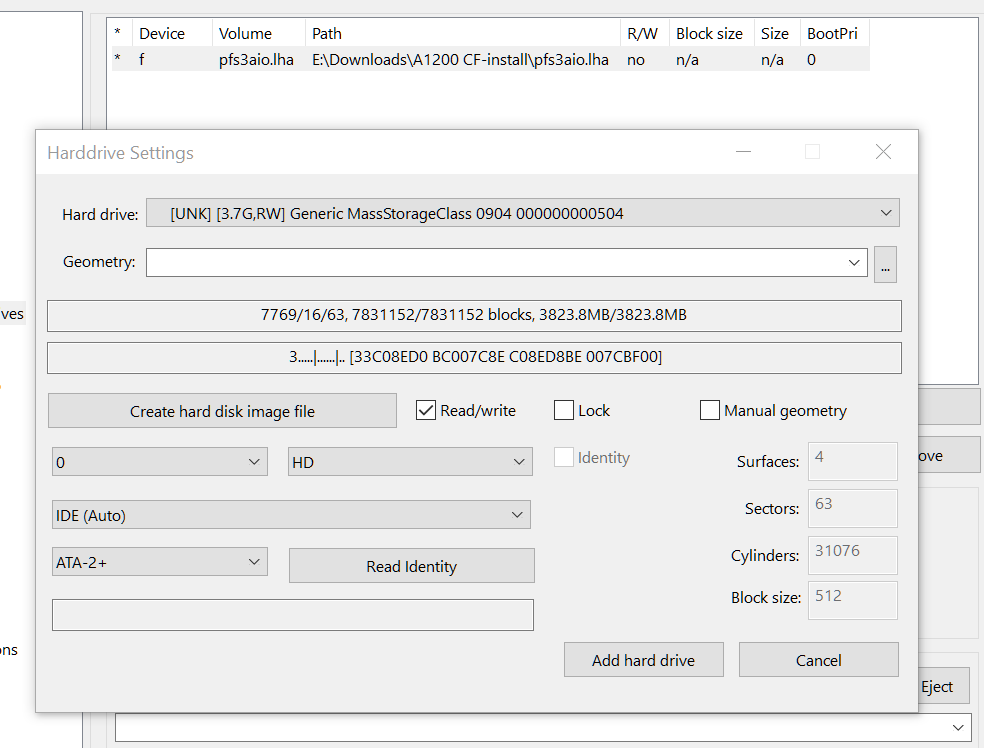
The next step is to add your Compact Flash card, and this is why you need to run WinUAE as administrator, otherwise it won’t work.
Click “Add Hard Drive”
Select the Compact Flash card as hard drive (it might be called something completely different on your machine)
Change from UEA to IDE (Auto)
Make sure Read/Write is checked
Click “Add hard drive”
Start the virtual machine!
Step 3 - Partition Compact Flash card
Now we need to partition and format the Compact Flash card for use in an amiga.
Open the Install disk and the HDTools drawer.
Start HDToolbox, you should see Interface SCSI, Address 0, LUN 0, Status Unknown
Click “Change drive type” -> “Define new” -> “Read configuration” -> “Continue” to configure the CF drive (ignore the values read, the Amiga does not really understand 4 GB Drive)
Click OK and go back to the list of hard drives in the system.
Click “Partition Drive”
Set up a small(ish) system partition, like 250 MB. Change the name to DH0.
Set up the rest of the CF Card as a partition, name it DH1.
Optional: Use the pfs3 file system
Check Advanced options and then click “Add/Update”
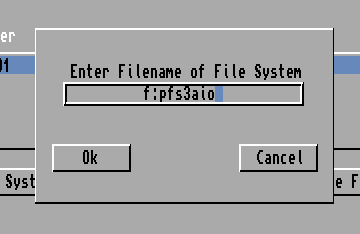
Click Add New File System
Enter filename f:pfs3aio (NOT pfs3_aio-handler as is claimed in the video, that is no longer correct) and click OK
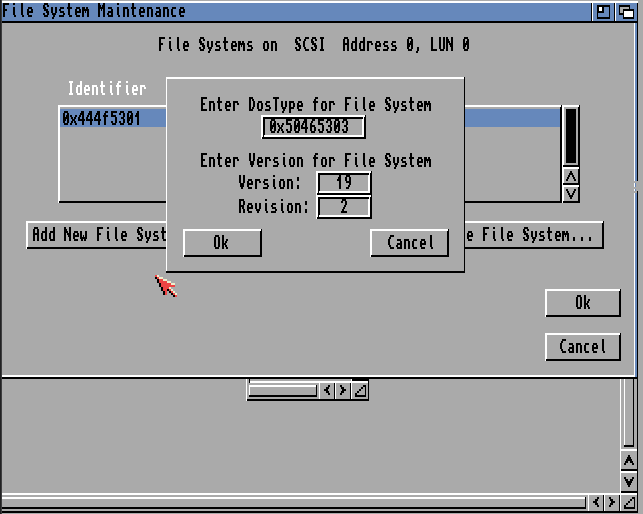
Change DosType to 0x50465303 and remember to press Enter in the field
Click OK and OK to get back to your partitions
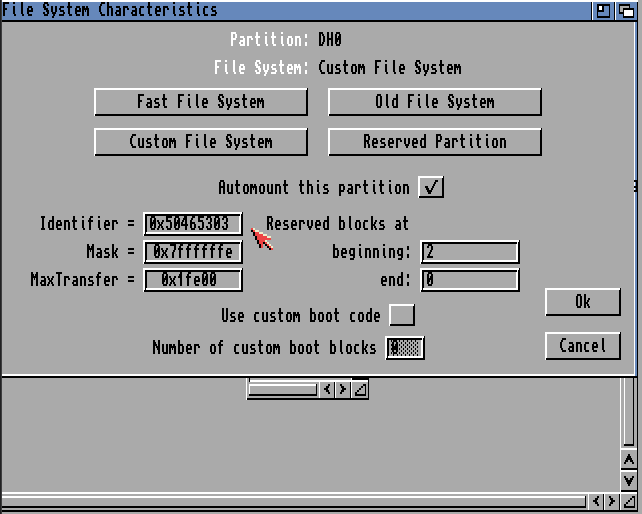
Select DH0, and click “Change” to change to the new file system
Select Custom File System or PFS/03 (depending on your Workbench version, I think)
Make sure Identifier says 0x50465303 (otherwise change it)
Change MaxTransfer to 0x1fe00 (and press enter)
Click OK
Repeat for DH1 (you don’t have to add the PFS3 file system again)
Now we’re done with the partitioning. Click OK, and then “Save changes to drive” (if you get an error here, you may want to try another Card Reader). Exit HDToolbox and reset the virtual Amiga.
Step 3 - Install Classic WB
Alright, if you’re still with me, it’s finally time to install Classic Workbench!
First, format the partitions by right clicking on them and select Icons -> Format disk from the menu. Name DH0 System and DH1 whatever you want (I just named mine Stuff). Make sure to use Quick Format. Confirm all warnings.
Then, press F12 to enter the WinUAE settings and go to CD & Hard Drives. Now you need to add the System.hdf file that you extracted from the Classic WB archive you downloaded in Step 1. Click Add Hardfile and select the System.hdf file. Make sure that the HD Controller is UAE, and name the device DH2. You should set boot prio to 1 (not 0).
You can remove the pfs3aio device, and then go to Floppy drives and eject all floppy drives. Restart the virtual machine.
It should now boot into the Classic WB installer. Follow the instructions (there are many, many options, and I have no good advice to give about them), and when prompted to insert a Workbench disk, press F12 to enter settings and do that. This is your change to choose between Workbench 3.0 and 3.1.
After the installation is done, and you have restarted, you probably will not see you compact flash partitions. This is because the Amiga gets confused by the two System partions. Rename the Classic WB partition to System2 (or something other than just System) and restart the virtual machine. You should now see all partitions.
Now you need to copy all the System/Workbench files from the System.hbf image to the System partition on the Compact Flash card. Start DOPUS by clicking RUN and selecting DOPUS. Select DH2: on the left (if DH2 does not appear in the list, you may have to type it in), and DH0: on the right. Select DH2 and click “All” to select all files, and then “Copy” to copy everything to the CF card. This will take a while.
After the copying is done, press F12 again to go into settings, and remove the System.hbf image from the hard disks. You should now only have your Compact Flash card left. Reset the virtual machine, and you should hopefully boot back into Classic Workbench.
Congratulations, you now have a working Compact Flash card for use in your Amiga. At this point, you could install it in the Amiga, start it, and everything should work. However, the point of Amiga is playing games, so we have one step left!
Step 4 - Copy Games and Demos for WHDLoad
First, we need to mount the folder where you put your games, demos and kickstarts as a file system in the virtual amiga.
Go into WinUAE settings -> CD & Hard Drives and click “Add Directory or Archive”.
Click “Select Directory” and point to where your Games and Demos are.
Put PC as both Device name and Volume label. Uncheck bootable. Click OK, and reset the machine.
You should now see a drive called PC on your workbench.
Second, we need to copy all the kickstart files. WHDLoad uses these to emulate[4] the correct environment for the games and applications.
If you haven’t done so already, unpack the kickstarts.lha archive into a folder.
Open DOPUS again, and select PC for the left side, and navigate into where you unpacked your kickstarts.
Copy all the kickstarts file to DH0:Devs/Kickstarts. Overwrite any files already there.
The Games and Demos need to be unpack into individual folders grouped by initial. For example Games/A/AnotherWorld_v2.4_0425. For games beginning with a number, the folder should be called 0_9. This can be done on the PC, or you can unpack them using DOPUS (as long as you have grouped them by initial).
Depending on the size of your CF card, all games might not fit, or if you just don’t want that many, you can just select the ones you like. I think it’s fine to group them into fewer folders then, e.g. A_E, F_K et cetera. At least the demos I downloaded were grouped like that, and it seems to work fine.
Now, use DOPUS again to copy the files from PC to DH1. If you did not unpack the archives earlier you can use Arc Ext to extract all the archives, buy you will have to do it folder by folder. I copied them to DH1:Gamesand DH1:Demos, but you can organise your files however you want.
Go back into settings, and remove all file systems except for the Compact Flash card. Reset the system, and it should boot back into Classic WB on your Compact Flash card.
Time to configure the system so that WHDLoad can find your games and demos!
Right click the top bar and select Workbench -> Startup from the drop down menu. Click Assign.
Change the locations for Games (and Demos) to where you put them. In my case, change the line that reads Assign >NIL: A-Games: SYS:Games to Assign >NIL: A-Games: DH1:Games (and likewise for demos).
Click the close icon in the top left corner and then click Save. Reset the machine again.
Finally, we need to add the games (and demos) to WHDLoad. Double click on the Files drawer in the bottom, and select AddGames. This may take some time. Do the same for AddDemos.
Now you can verify that the games are available. Right click on the desktop (of the Amiga!) and select RUN -> Games. This should bring up the GamesMenu where you now should see a long list of games.
Step 5 - Hardware install
There is not really much to this, and the video explains it pretty good. Use a CF-IDE adapter of some kind, and connect it to the IDE port of the Amiga. That’s it.
UPDATE: When I tried to put the CF card in my Amiga 1200, it didn’t recognize it, even though it had worked in my Amiga 600. I thought I had the same CF-IDE adapter, but on closer inspection it turned out they were not exactly the same. They both say CF-IDE44/2.0 ADAPTER, but the one that works has version V.H2, while the other one has version V.B1. And it seems that other people have had the same issue with the V.B1. So if you use this kind of CF-IDE adapter, make sure it says V.H2 and NOT V.B1!
Start the Amiga (the real one), and it should boot to your Compact Flash card. Bring up the RUN -> Games menu, and double click a game to start it!
1.Youtube comments are more useful than their reputation would have you believe! ↩
If you are reading this on a computer[1] with a dark system theme, you might notice that this blog now also has a dark theme. Although dark themes to be all the craze nowadays, I’ve been using dark themes for quite some time, and I’ve been wanting to implement a dark theme option for my blog since forever. But I could never decide on wether it was to be something that would change automatically according to the time of day, or if the sun was up or not, or something the visitor could toggle.
Well, as it turns out, while I have been procasticating, the browser vendors have solved the problem for me! Earlier this year a new CSS media query was introduced: prefers-color-scheme.
This little gem equals dark if the system has a dark color scheme, and light otherwise. And it is supported by the latest versions of Firefox, Chrome, Safari and even Edge[2]. It works something like this:
1 2 3 4 5 6 7 8 9 10 11 12 13 14
/* Default color scheme */
body {
    background-color: #fff;
    color: #000;
}

/* Color scheme for dark mode */
@media (prefers-color-scheme: dark) {
    body {
        background-color: #000;
        color: #555;
    }
}
If the browser does not support prefers-color-scheme, or if it has a preferred color scheme other than “dark” (i.e. light), it will just ignore the overrides in the media query. So this is basically all I needed to do (well, I had to make a few more changes) to make the theme of the site follow the system theme. Sweet!