For the last couple of months, I’ve been working on a new version of a site for a client that uses Swish for payments. This new version will be hosted as an Azure App Service. The Swish API is pretty nice and straight forward, but for some reason they have implemented authentication and security using client certificates instead of something like OAuth 2. This makes it a bit more difficult, especially in Azure, since neither the server certificate for the API or the client certificates are signed by trusted authorities.
In fact, during my research[1] I found many claims that it simply does not work, that you have to use a virtual machine in order to make the calls to the Swish API work. However, I also this answer on Stack Overflow that claimed that the trick was simply to upload all certificates to Azure, and this turned out to be true.
So, in order to remember this for the next time, and hopefully help anyone else with the same problem, I decided to write a more comprehensive guide on how to get this working.
1. Download the simulator certificates
All examples will be based on the Swish Test Merchant certificates, which can be downloaded from the Swish developer page (click View Guide in the Simulator Guide box[2]). Extract the downloaded file and locate the file named Swish_Merchant_TestCertificate_1234679304.p12 (or whatever they may have changed it to), and change the extension to pfx, since that is the extension that Azure will expect later[3].
2. Extract all the root certificates from the .p12/.pfx file
The .pfx file contains the whole certificate chain, and when working on a Windows machine, it will be enough to install that to your CurrentUser och LocalMachine store (depending on how you run your application), but in Azure you will need to upload all certificates separately. It is therefore necessary to extract the certificates from the file. This can be done in a number of different ways. If you are working on a Windows machine, you could just install the certificate, and then go into the certificate store and export the resulting certificates.
However, you can also do it from the command line with openssl. Now, I’m no expert on openssl, and I’m sure there is a better way to do this, this answer on the Unix & Linux StackExchange for example suggests piping the result through sed, but we’re only doing this once, so this works good enough.
First, list the certs in .pfx file and send the results to a text file[4].
openssl pkcs12 -nokeys -info -in ./Swish_Merchant_TestCertificate_1234679304.pfx -passin pass:swish > all_the_certs.txt
Then, open the text file in a text editor, and locate the two last certificates (the first one is your actual client certificate, you can ignore that for now). Now, copy everything from and including -----BEGIN CERTIFICATE----- to (and still including) -----END CERTIFICATE----- and paste it to a new file called Swedbank_Customer_CA1_v1_for_Swish_Test.cer, which should then look like this:
1 | -----BEGIN CERTIFICATE----- |
Repeat for the second certificate, but call the file Swedbank_Root_CA_v2_for_Swish_Test.cer.
Upload the certificates to Azure and configure your App Service
Now you need to upload the certificates to you App Service in Azure. Log in to your Azure Portal and navigate to TLS/SSL settings in you App Service. Click on the Private Key Certificates (.pfx) tab, and then on Upload Certificate.

Select the Swish_Merchant_TestCertificate_1234679304.pfx file[5] and enter the password (which is just swish for the simulator certificate). Click Upload and you should see the certificate in the Private Key Certificates list. If you do this right now, you will also get a warning that the certificate is about to expire, which is true, but there is no newer certs yet, so we’ll just have to repeat this process in a month or two.
Update 2020-05-15
New certificates for the Swish sandbox finally arrived (mss_test_1.8.1)! I have verified that this exact same procedure works for them as well. However, they are now issued by Nordea rather than Swedbank, so it would make sense to call the certicates something with Nordea instead! :-)
Make sure to change the thumbprints as well!
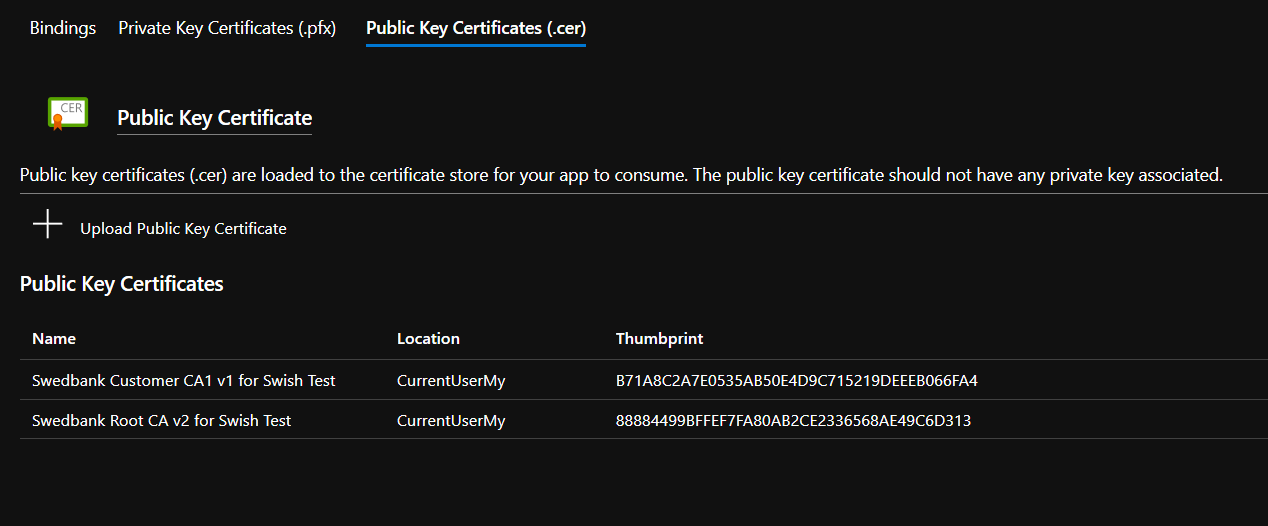
Next, you need to upload the public CA certs that you extracted earlier. Click on the Public Key Certificates (.cer) tab, and then on Upload Public Key Certificate. Select the Swedbank_Customer_CA1_v1_for_Swish_Test.cer file, and give it a name, something like Swedbank Customer CA1 v1 for Swish Test maybe? Click Upload and to the same for the other certificate.
In order for you App Service to be able to access the certificates, you need to set the environment variable WEBSITE_LOAD_CERTIFICATES. The value should be either * if you want to load all certificates, or a comma separated list of thumbprints if you want to limit which certificates that are available to your application. So go to Configuration -> Application settings and click New application setting to add the setting.
NOTE: If you have multiple slots in your App Service, you have to do this for all slots!
In order to make sure that the certificates are uploaded correctly, and available to your application, you can use the debug console. Go to Advanced Tools (under the Development Tools heading), ang click Go to open it in a new window. Select Debug Console -> PowerShell in the top menu.
1 | Kudu Remote Execution Console |
You should be able to see all the certificates you have uploaded here. Take note of the thumbprints, you will need them shortly!
Use the client certificates when connecting to the Swish REST API
These examples will use the HttpClient in dotnet core 3.1, because that is what I’ve been using. What we need to do is create our HttpClient with a custom HttpClientHandler that includes all the client certificates. This also lets us handle the validation failure that will occur for the server certificate, since it is not signed by a trusted authority.
The first step is to load all the certificates. You will need to pass all the thumbprints, both for your private client certificate and for the public certs you extracted.
1 | public X509Certificate2Collection GetCertificates(string[] thumbprints) |
The next step is to create our HttpClient with the custom HttpClientHandler:
1 | public HttpClient CreateClient() |
And that should be it! Unless I forgot something. If you follow this guide, and still have problems, please comment below, and I will try to update the guide. I do have it working now, so I should be able to figure out the problem!
- 1.Yes, that is what we call googling now! ↩
- 2.This will almost certainly be incorrect within minutes of publishing this, since they seem to change it between every time I look! ↩
- 3.p12 and pfx are just two different extension for the same certificate format, PKCS12. ↩
- 4.The password for the simulator certificates really is just swish. For production certs, you will of course need to use the real password. ↩
- 5.You renamed it, remember? ↩