About a year ago, I bought an Amiga 600. It did not have a hard drive, but all Amiga 600 have an IDE port, and you can use a Compact Flash card with a CF-IDE adapter as a hard drive. That worked fine, and I could install Workbench on the CF card, and use it. But eventually I though I should try to use WHDLoad, so that I could run more games directly from the hard drive. I found a video by Nostalgia Nerd on Youtube, where he goes through the process of installing Classic Workbench and WHDLoad on a Compact Flash card, unfortunately this video is (currently) four years old, and also very… quick? With the help of the comments[1] and some trial and error, I managed to get it working, though.
Now, recently I was generously given an Amiga 1200. This one actually had a hard drive, but who knows how long that will keep on working, so I though I’d replace it with a Compact Flash card as well. This time, however, for the benefits of my readers[2] I thought I’d write down the process in a blog post. I thought it might be useful because a) I prefer written instructions, and b) it would give me a chance to update and correct the instructions so that they actually work.
The original video can be found here, along with instructions and download links.
I won’t go into the hardware side of this, because there’s really nothing to it. But you will need a Compact Flash card with a capacity of at least 4GB, some kind of CF-IDE adapter (not neccessarily that one) and of course a Compact Flash reader for your computer. This tutorial also assumes that you are running Windows, although it should be possible to use pretty much the same procedure with FS-UAE on Linux or Mac.
Step 1 - Download stuff
First of all, you will need to download a bunch of software.
WinUAE - Amiga emulator
This tutorial uses the WinUAE amiga emulator, which can be found on winuae.net. I was using version 4.0.1, although I now see that version 4.3.0 is available. From what I can tell, the difference seems to be very minor, so it shouldn’t matter.
Kickstart / Workbench
You will need a copy of the Kickstart ROM and Workbench disk images, version 3.0 or 3.1. This is still under copyright, and at least the Workbench images can be bought from amigaforever.com. They can also be found on several places on the Internet, as usual DuckDuckGo is your friend.
PFS3 File System support
You probably want to use the PFS3 file system, and you will need to download the handler for that from http://aminet.net/package/disk/misc/pfs3aio. This is not strictly necessary, but it’s faster than the standard AFFS and supports larger partitions.
Classic WB
Hard disk images for Classic WB can be found at classicwb.abime.net. I used the LITE version for the Amiga 1200, but for an Amiga 600 you probably want the 68K version.
You will also need kickstart files for WHDLoad. These can be found for example at (paradise.untergrund.net)[https://paradise.untergrund.net/tmp/PREMIUM/amiga_tools/], it’s the kickstarts.lha file you’re looking for.
Game and Demo packs
The original tutorial suggested that game packs could be downloaded from http://kg.whdownload.com/kgwhd/, but that doesn’t seem to work anymore. I downloaded both games and demo packs from ftp://grandis.nu/Commodore_Amiga/Retroplay/, but they are available from many more places, just search for whdload games pack.
Put everything in a folder somewhere on your PC.
Step 2 - Clean the CF card
In order to use the Compact Flash card in an Amiga, you need to remove all previous file system information from it. In order to do this, run diskpart in an Administrative command prompt.
First, list your disk by entering list disk. This should give you a result something like this:

Next, select your compact flash card, in my case it’s disk 6: select disk 6. Be very, very sure that you select the correct disk. You will destroy everything on it.

If you want to be completely sure that you have selected the correct disk, you can run detail disk just to verify. When you are 100% sure, run clean. This completely wipes the file system information from the disk, making it ready to use in the Amiga. exit diskpart.
Step 3 - Configure virtual Amiga in WinUAE
Start WinUAE as Administrator. Now we need to configure the system, and make it a little faster than a real Amiga. Otherwise this process will take literally[3] forever.
CPU and FPU
- CPU: 68040 (or maybe 68060) / JIT
- FPU: CPU Internal / More Compatible
- CPU Emulation speed: Fastest possible

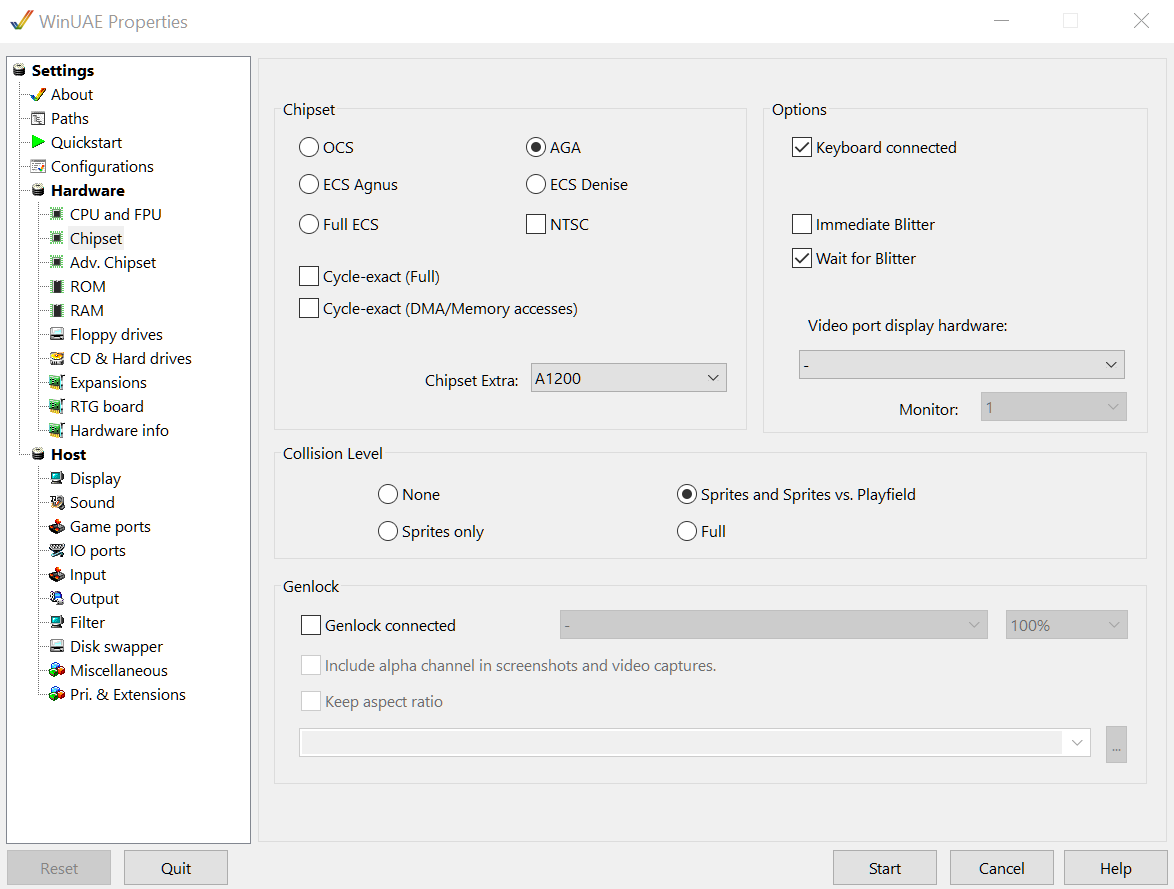
Chipset
Uncheck cycle exact, otherwise leave the default values.
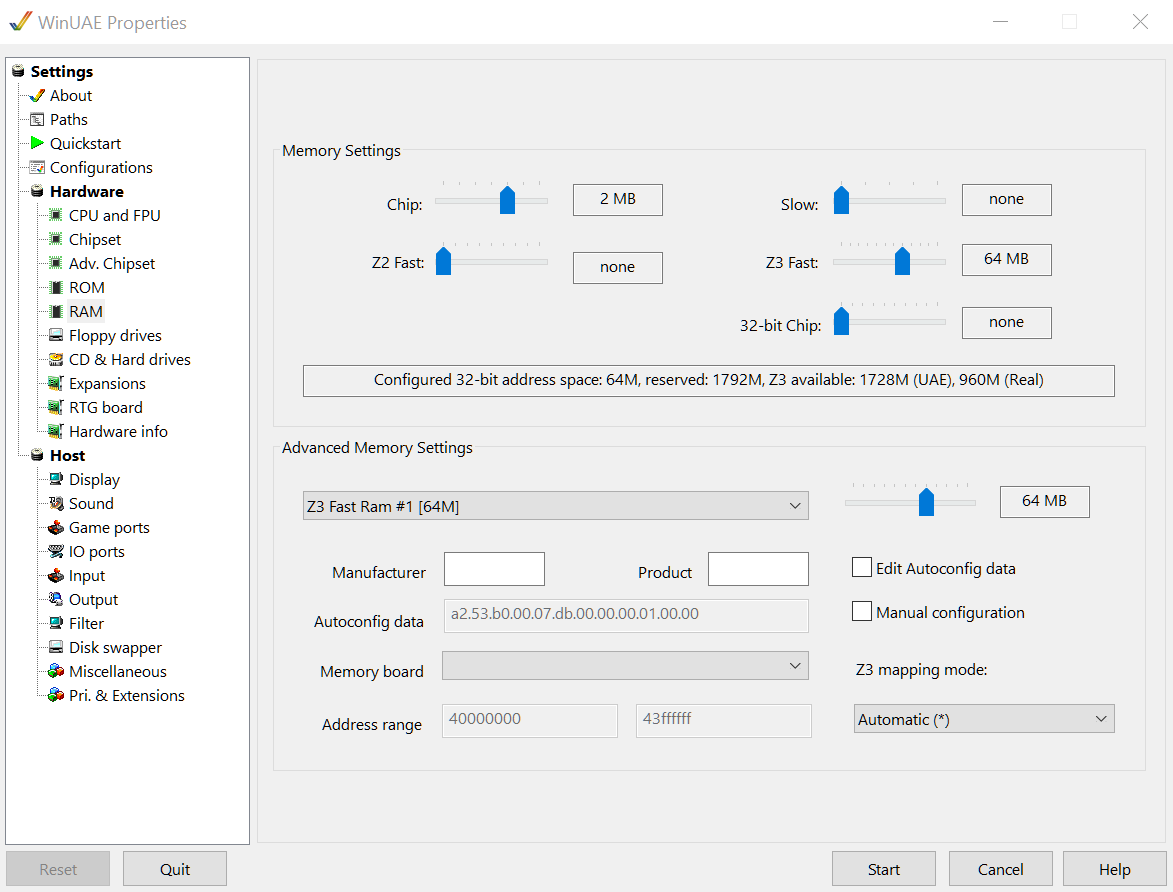
RAM
Add some Z3 Fast RAM, I used 64 MB, just as in the original video.
ROM
Use the appropriate Kickstart ROM (probably the same as in your amiga). It needs to be version 3.0 or 3.1.
Floppy drives
Add the Workbench installer disk image to DF0:. It should not be write protected (use a copy if you don’t want to risk modifying your original image).
Hard drive (Compact Flash, really)
Now you need to add your compact flash card as a file system, as well as the pfs3 handler. Enter the CD & Hard drives section.
Add the pfs3aio archive as device f
If you want to use the PFS3 file system (which is recommended), you need to mount the archive with the handler as a file system as well:
- Click “Add Directory or Archive”
- Select “Archive or plain file”
- Select pfs3aio.lha
- Device name: f

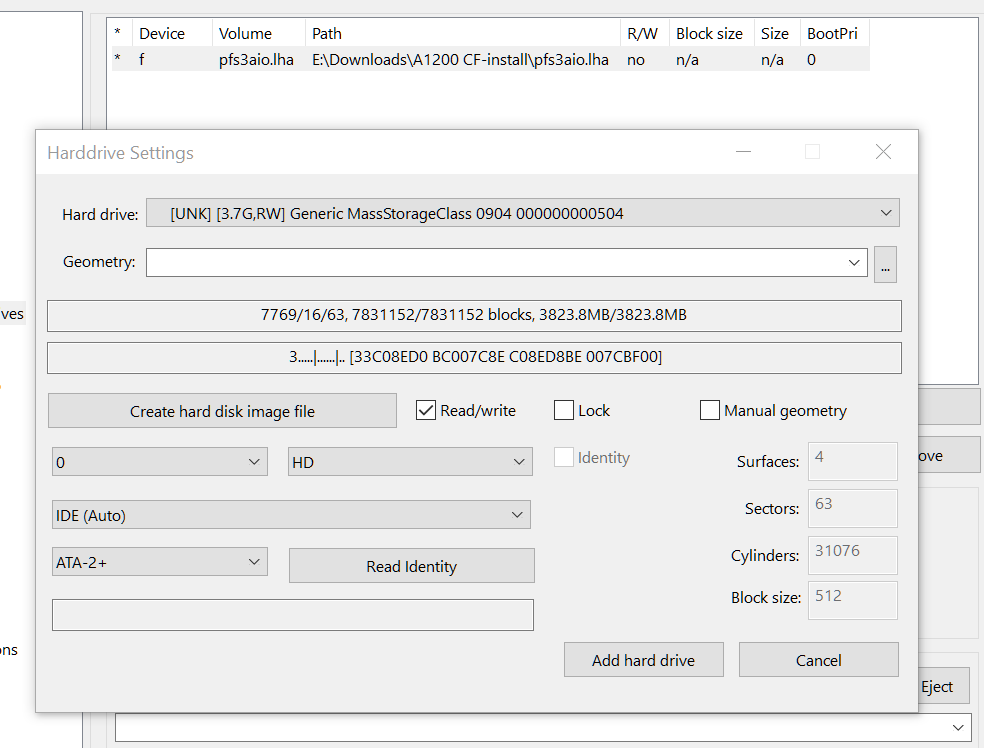
Add the Compact Flash card
The next step is to add your Compact Flash card, and this is why you need to run WinUAE as administrator, otherwise it won’t work.
- Click “Add Hard Drive”
- Select the Compact Flash card as hard drive (it might be called something completely different on your machine)
- Change from UEA to IDE (Auto)
- Make sure Read/Write is checked
- Click “Add hard drive”
Start the virtual machine!
Step 3 - Partition Compact Flash card
Now we need to partition and format the Compact Flash card for use in an amiga.

- Open the Install disk and the HDTools drawer.
- Start HDToolbox, you should see Interface SCSI, Address 0, LUN 0, Status Unknown

- Click “Change drive type” -> “Define new” -> “Read configuration” -> “Continue” to configure the CF drive (ignore the values read, the Amiga does not really understand 4 GB Drive)
- Click OK and go back to the list of hard drives in the system.
- Click “Partition Drive”
- Set up a small(ish) system partition, like 250 MB. Change the name to DH0.
- Set up the rest of the CF Card as a partition, name it DH1.

Optional: Use the pfs3 file system
- Check Advanced options and then click “Add/Update”
- Click Add New File System
- Enter filename
f:pfs3aio(NOT pfs3_aio-handler as is claimed in the video, that is no longer correct) and click OK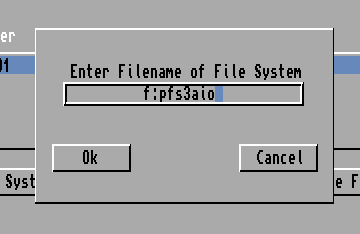
- Change DosType to
0x50465303and remember to press Enter in the field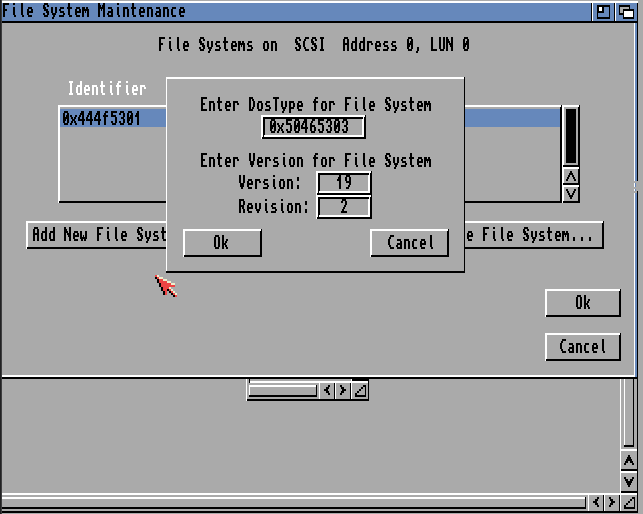
- Click OK and OK to get back to your partitions
- Select DH0, and click “Change” to change to the new file system
- Select Custom File System or PFS/03 (depending on your Workbench version, I think)
- Make sure Identifier says
0x50465303(otherwise change it) - Change MaxTransfer to
0x1fe00(and press enter)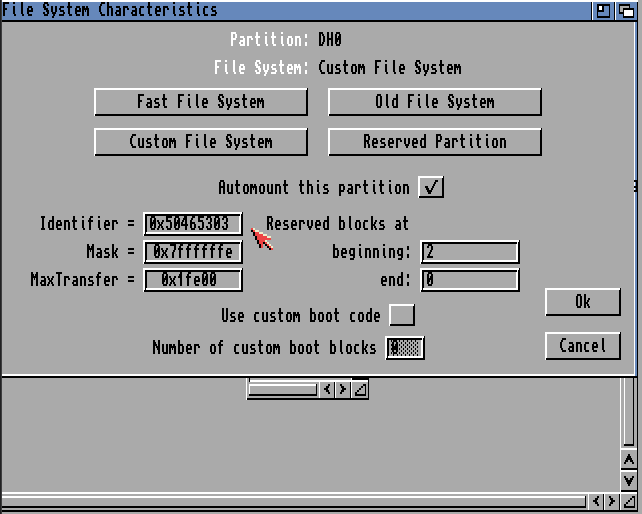
- Click OK
- Repeat for DH1 (you don’t have to add the PFS3 file system again)
Now we’re done with the partitioning. Click OK, and then “Save changes to drive” (if you get an error here, you may want to try another Card Reader). Exit HDToolbox and reset the virtual Amiga.
Step 3 - Install Classic WB
Alright, if you’re still with me, it’s finally time to install Classic Workbench!
First, format the partitions by right clicking on them and select Icons -> Format disk from the menu. Name DH0 System and DH1 whatever you want (I just named mine Stuff). Make sure to use Quick Format. Confirm all warnings.
Then, press F12 to enter the WinUAE settings and go to CD & Hard Drives. Now you need to add the System.hdf file that you extracted from the Classic WB archive you downloaded in Step 1. Click Add Hardfile and select the System.hdf file. Make sure that the HD Controller is UAE, and name the device DH2. You should set boot prio to 1 (not 0).

You can remove the pfs3aio device, and then go to Floppy drives and eject all floppy drives. Restart the virtual machine.
It should now boot into the Classic WB installer. Follow the instructions (there are many, many options, and I have no good advice to give about them), and when prompted to insert a Workbench disk, press F12 to enter settings and do that. This is your change to choose between Workbench 3.0 and 3.1.

After the installation is done, and you have restarted, you probably will not see you compact flash partitions. This is because the Amiga gets confused by the two System partions. Rename the Classic WB partition to System2 (or something other than just System) and restart the virtual machine. You should now see all partitions.
Now you need to copy all the System/Workbench files from the System.hbf image to the System partition on the Compact Flash card. Start DOPUS by clicking RUN and selecting DOPUS. Select DH2: on the left (if DH2 does not appear in the list, you may have to type it in), and DH0: on the right. Select DH2 and click “All” to select all files, and then “Copy” to copy everything to the CF card. This will take a while.

After the copying is done, press F12 again to go into settings, and remove the System.hbf image from the hard disks. You should now only have your Compact Flash card left. Reset the virtual machine, and you should hopefully boot back into Classic Workbench.
Congratulations, you now have a working Compact Flash card for use in your Amiga. At this point, you could install it in the Amiga, start it, and everything should work. However, the point of Amiga is playing games, so we have one step left!
Step 4 - Copy Games and Demos for WHDLoad
First, we need to mount the folder where you put your games, demos and kickstarts as a file system in the virtual amiga.
- Go into WinUAE settings -> CD & Hard Drives and click “Add Directory or Archive”.
- Click “Select Directory” and point to where your Games and Demos are.
- Put
PCas both Device name and Volume label. Uncheck bootable. Click OK, and reset the machine.
- You should now see a drive called PC on your workbench.
Second, we need to copy all the kickstart files. WHDLoad uses these to emulate[4] the correct environment for the games and applications.
- If you haven’t done so already, unpack the kickstarts.lha archive into a folder.
- Open DOPUS again, and select PC for the left side, and navigate into where you unpacked your kickstarts.
- Copy all the kickstarts file to
DH0:Devs/Kickstarts. Overwrite any files already there.

The Games and Demos need to be unpack into individual folders grouped by initial. For example Games/A/AnotherWorld_v2.4_0425. For games beginning with a number, the folder should be called 0_9. This can be done on the PC, or you can unpack them using DOPUS (as long as you have grouped them by initial).
Depending on the size of your CF card, all games might not fit, or if you just don’t want that many, you can just select the ones you like. I think it’s fine to group them into fewer folders then, e.g. A_E, F_K et cetera. At least the demos I downloaded were grouped like that, and it seems to work fine.
Now, use DOPUS again to copy the files from PC to DH1. If you did not unpack the archives earlier you can use Arc Ext to extract all the archives, buy you will have to do it folder by folder. I copied them to DH1:Gamesand DH1:Demos, but you can organise your files however you want.
Go back into settings, and remove all file systems except for the Compact Flash card. Reset the system, and it should boot back into Classic WB on your Compact Flash card.
Time to configure the system so that WHDLoad can find your games and demos!
- Right click the top bar and select Workbench -> Startup from the drop down menu. Click Assign.
- Change the locations for Games (and Demos) to where you put them. In my case, change the line that reads
Assign >NIL: A-Games: SYS:GamestoAssign >NIL: A-Games: DH1:Games(and likewise for demos). - Click the close icon in the top left corner and then click Save. Reset the machine again.

Finally, we need to add the games (and demos) to WHDLoad. Double click on the Files drawer in the bottom, and select AddGames. This may take some time. Do the same for AddDemos.
Now you can verify that the games are available. Right click on the desktop (of the Amiga!) and select RUN -> Games. This should bring up the GamesMenu where you now should see a long list of games.

Step 5 - Hardware install
There is not really much to this, and the video explains it pretty good. Use a CF-IDE adapter of some kind, and connect it to the IDE port of the Amiga. That’s it.
UPDATE: When I tried to put the CF card in my Amiga 1200, it didn’t recognize it, even though it had worked in my Amiga 600. I thought I had the same CF-IDE adapter, but on closer inspection it turned out they were not exactly the same. They both say CF-IDE44/2.0 ADAPTER, but the one that works has version V.H2, while the other one has version V.B1. And it seems that other people have had the same issue with the V.B1. So if you use this kind of CF-IDE adapter, make sure it says V.H2 and NOT V.B1!
Start the Amiga (the real one), and it should boot to your Compact Flash card. Bring up the RUN -> Games menu, and double click a game to start it!