Johan Driessen

Getting the Firefox button back in Ubuntu 11.04 with Unity

Since I’ve been trying to learn more about Ruby on Rails (everybody else seems to be doing it, so why shouldn’t I?) lately, I’ve been spending quite some time in Ubuntu instead of my usual Windows 7 environment. And since that’s the way I do things, I immediately upgraded to 11.04 when it was released.

With Ubuntu 11.04 you get Unity instead of Gnome, which is pretty cool. I generally like it, especially the fact that you can, just like I do in Win7, just press the Windows key and type a few letters to start a program instead of having to find it in the menu. A new feature that I’m not so impressed with, though, is the fact that they have moved the menus up to the top, instead of having them in the application windows, just like in Mac OS. I mostly find it confusing (it’s just way to easy to have focus on the wrong window and using the wrong menu – no usability there) and unnecessary, but I suppose I can live with it.

Except in Firefox 4. I’ve been using it since the early betas, and I’ve just recently gotten used to, and actually started liking, the Firefox button with the combined menu. And bam - the old menus are back in Unity!

Luckily, it turns out there’s an easy way to restore law and order to the galaxy:

$ sudo apt-get remove firefox-globalmenu

And just like that, the Firefox button is back, and the menus in the top bar are gone!

World wide visitors

Totally off topic for this blog, since I try not to write about random things, but rather keep to the technical topics, but I just had to share this map from Google Analytics of where my visitors come from.

map_of_visitors

Yep, it seems you come from all over the world (with a slight overweight for the U.S of A Smile)). I’m a little weak in central Africa it seems, although I’m very grateful to the one guy (or gal) in Uganda, and in Sudan, who visited my blog this last month. Hope you found what you were looking for! And it seems that no one in Greenland is interested…

Anyway, it’s fun to know that people from all over the world are finding the way to this blog (even if about 60% of the visitors come only for the post about getting asp.net 4 working in IIS 6)!

Next post will be back to the technical stuff, I promise!

Getting Mercurial 1.8.1 to work against a repository with a self-signed SSL certificate

For a project with some friends, we’ve set up our own private Mercurial repository. We’re publishing it using hgweb and apache, and since we want it encrypted, we use a self-signed certificate. This has been working fine until recently, when I upgraded Mercurial from 1.6.x to 1.8.1, because it turns out that in Mercurial 1.7.2, they started throwing a big fat error when you try to work against a repository with a self-signed certificate:

1
2
3
C:\Users\Johan\HgReps\MsmqRestService>hg in
abort: error: _ssl.c:490: error:14090086:SSL routines:SSL3_GET_SERVER_CERTIFICAT
E:certificate verify failed

There is a long thread at selenic.com discussing why you can’t push/pull to a https server with a self-signed certificate. But to save you (and myself) from having to read it (again), I thought I’d jot down the steps to get it working again.

  1. Open your repository in a web browser. I used Firefox 4.
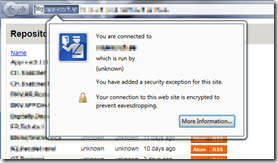
  2. Save the certificate. In Firefox by clicking the domain name, more information, view certificate, details tab, export certificate. I’m sure you can figure out how to do it in another web browser as well. Be sure to select X.509 Certificate (PEM), when exporting.
    A totally unnecessary picture showing how to display the certificate in Firefox 4. But the post looks much nicer with an image in it!
  3. Edit the cacert.pem file for TortoiseHg (if that’s the way you installed mercurial).
    On my machine, the full path is C:\Program Files\TortoiseHg\hgrc.d\cacert.pem.
  4. Copy the contents from your exported certificate file, and paste them to the bottom of cacert.pem
  5. Rejoice!

Up and running on the Alpha Blog Engine!

As I wrote in a post back in October, I’ve been writing my own blog engine, with the plan to run my blog on that instead. And today, finally, I was able to migrate my blog to my own blog engine, called Alpha! It took a little longer than I had hoped (the Devil is in the details…), and there are still lots of things I want to do on it, but it seems to work nicely, and I’m pretty happy with it!

A quick overview of the Alpha Blog Engine:

It’s built to be the perfect blog platform for a technical blogger, assuming that you can run it on a Windows Server, that is. Making it able to run on Mono is on my to-do-list, though.

If anyone is interested, the source is available on bitbucket: https://bitbucket.org/nahojd/alpha/overview

Getting Ruby on Rails to work on Ubuntu 10.10

UPDATE 2012-01-25 These instructions are now deprecated, as I’ve written an updated post on how to get Ruby on Rails working on Ubuntu 11.10.

UPDATE 2011-06-21 – I noticed that the install script at beginrescueend.com has changed. I have updated this post to reflect this.

Since I’m still on parental leave, and just have too much god damn time on my hands, I thought I’d finally give Ruby on Rails a good try, so first I finished Rails for Zombies, and then I started on the Ruby on Rails Tutorial (and by the time I’ve finished that, I’ll have come up with something to build). Since Rails feels kind of Linux-ish, and I like working in Linux anyway (despite being a .NET developer), I jumped at the chance of using my Ubuntu 10.10 installation for this.

To my surprise, however, this proved quite the challenge. It turns out that Ubuntu only has built in support for Ruby 1.8.7, and naturally I wanted to use 1.9.2. So, since I’ll have to do this on at least one other computer, and probably again, as I regularly reinstall my computers, I thought I’d post the steps I used to get everything working. Possibly someone else might find this useful, as well.

Note, everytime I start some code with the $ sign, it represents a prompt.

1 - Prerequisites

First of all, it’s a good idea to install some prerequisites, that will be needed anyway:
$ sudo apt-get install vim-gnome curl git git-core libxslt-dev libxml2-dev libsqlite3-dev

Technically, gvim (vim-gnome) is not a prerequisite, but it’s still nice to have! Some of these you might already have installed, in that case, congratulations.

2 - Install RVM

The first thing you want to do is to install the Ruby Versioning Manager, or RVM. I basically followed the instructions on the Installing RVM page, but these are the steps I took:

  1. $ bash < <( curl http://rvm.beginrescueend.com/releases/rvm-install-head ) <— Does not work anymore!
    $ bash < <(curl –sk https://rvm.beginrescueend.com/install/rvm)
  2. Make some changes in .bashrc:
    Add to the end: [[ -s "$HOME/.rvm/scripts/rvm" ]] && source "$HOME/.rvm/scripts/rvm"
    Change the line that reads [ -z "$PS1" ] && return to if [[ -n "$PS1" ]] ; then
    Add before the row you added to the end (on it’s own row): fi
  3. Restart the terminal, or just run $ source "$HOME/.rvm/scripts/rvm
  4. Check that rvm works, run $ type rvm | head -1. You should get the result “RVM is a function”
  5. It might be a good idea to run $ rvm notes, just to make sure everything is fine and you haven’t missed anything so far.

3 - Install Ruby 1.9.2 with RVM

  1. $ rvm package install openssl
  2. Time to install Ruby 1.9.2!
    $ rvm install 1.9.2 --with-openssl=$HOME/.rvm/usr

Note: The openssl stuff is not needed for rails to work, but if you want to use Heroku to publish your stuff, you’ll need it, so might as well install it right away!
3. $ rvm --default use 1.9.2

4 - Install RubyGems

Dowload RubyGems from rubyforge.org and unzip it. Then run ~/rubygems-1.5.2$ ruby setup.rb.

5 - Install Rails

Ok, final step. Run $ gem install rails to install Rails. This takes a little while, but when it’s done everything should work. You can check that everything works by creating a new rails application in a directory of your choice: $ rails new test_app, or just jump to “The first application” chapter in the Rails Tutorial.

And yeah, some of these steps might not actually be necessary, or may break your computer. Also, these steps installs RVM, Ruby and Rails only for the current user, not system-wide.

An even simpler way not to send email

I thought this was to simple to blog about, but then I read this post by my colleague Daniel Saidi, and I thought “what the hell”.

Yes, when developing web applications you very often need to send emails. But during development, or testing for that matter, you often don’t actually want to send any emails. You could, of course, go the interface-injection-way, as in Daniel’s post. But there is actually an even easier way, build into .NET. Just edit the config for system.net/mailsettings.

Normally, your outgoing mail settings look something like this

1
2
3
4
5
6
7
<system.net>
<mailSettings>
<smtp deliveryMethod="Network">
<network host="smtp.server.com" port="25" />
</smtp>
</mailSettings>
</system.net>

Now, if you don’t want to send any emails, just change them to use a pickup directory instead.

1
2
3
4
5
6
7
<system.net>
<mailSettings>
<smtp deliveryMethod="SpecifiedPickupDirectory">
<specifiedPickupDirectory pickupDirectoryLocation="c:\temp\email"/>
</smtp>
</mailSettings>
</system.net>

And voilà, instead of sending email, you emails gets saved in a directory of your choice instead, which means that you could for example inspect the actual emails in your tests, and for you debug config just drop them in a directory that is automatically cleaned on every build. And for you deploy config, you just use the normal Network delivery method again. Piece of cake!

Progress on the new blog engine

Hmmm, it seems that I did not manage to replace Subtext with my new blog engine, Alpha, before the end of 2010 as I optimistically thought when I started in October. It turns out that there are other things to do than to program when you’re on paternal leave (ya, rly!)

I am, however, making progress with it. It basically displays the posts as I want it to, and the tagging and the tag cloud is working. What I really need to do in order to replace Subtext is to get Alpha to work with Windows Live Writer, since I use that to write all my posts. There are also other small things, like pingbacks/trackbacks, the RSS feed and an archive. The devil is, as always, in the details. So I won’t wager a prognosis for when it’s done this time.

I must say, though, that it’s a joy to work with RavenDB as a database, and I’ll hate going back to work with relational databases when my leave is over. What are the odds I can convince everyone at work (including customers) to work only with document databases from now on? I’ll try to write some posts on my experiences with document databases in general and RavenDB in particular in the near future.

I also enjoy working with Mercurial and Bitbucket for versioning control, and I don’t even need Visual Studio integration, since there are no checkouts! Don’t miss TFS one bit!

Happy New Year!

Dependency injection in ASP.NET MVC 3 got a lot simpler

In my project of writing my own blog engine, I’m using ASP.NET MVC 3 beta, and I like what they have done to simplify the dependency injection! Let me show you the difference.

The MVC 2 way

First, I need a registry (that’s just ScructureMap, nothing really to do with MVC).

1
2
3
4
5
6
7
8
9
10
11
12
//The most simple registry I could think of
public class AlphaRegistry : Registry
{
public AlphaRegistry()
{
Scan( x =>
{
x.AssembliesFromApplicationBaseDirectory();
x.WithDefaultConventions();
} );
}
}

Then, in MVC 2, you needed to make your own ControllerFactory (actually, you could get this from the MvcContrib project, if it was up to date):

1
2
3
4
5
6
7
8
9
10
11
12
13
14
15
16
17
18
19
20
public class StructureMapControllerFactory : DefaultControllerFactory
{
protected override IController GetControllerInstance( RequestContext requestContext, Type controllerType )
{
if (controllerType == null)
return base.GetControllerInstance( requestContext, controllerType );

IController result = null;
try
{
result = ObjectFactory.GetInstance( controllerType ) as Controller;
}
catch (StructureMapException)
{
System.Diagnostics.Debug.WriteLine( ObjectFactory.WhatDoIHave() );
throw;
}
return result;
}
}

And finally, you needed to replace the default ControllerFactory with the StructureMapControllerFactory:

1
2
3
4
5
6
7
8
9
public class MvcApplication : HttpApplication
{
protected void Application_Start()
{
//Other stuff that need to be done on application start here

ControllerBuilder.Current.SetControllerFactory( typeof( StructureMapControllerFactory ) );
}
}

Not the most difficult thing in the world, but still some amount of work.

The MVC 3 way

Ok, what do you do in MVC 3? First of all, we still need our Registry, since that is how we setup StructureMap. But we don’t need our ControllerFactory at all! Instead, MVC 3 introduces a DependencyResolver with 3 methods:

1
2
3
4
public static void SetResolver(IDependencyResolver resolver);
public static void SetResolver(object commonServiceLocator);
public static void SetResolver(Func<Type, object> getService,
Func<Type, IEnumerable<object>> getServices);

So, instead of creating a ControllerFactory, you can create a DependencyResolver, which is more general, and only needs two simple methods: GetService and GetServices. However, an even easier way to do it, which I like, is to use the last overload. So, in Application_Start, we get:

1
2
3
4
5
6
7
8
DependencyResolver.SetResolver(
t =>
{
try { return ObjectFactory.GetInstance( t ); }
catch { return null; }
},
t => ObjectFactory.GetAllInstances<object>().Where( s => s.GetType() == t )
);

And that’s all we need! And anywhere that MVC needs to resolve a dependency it will use this. And if it fails to resolve (i.e. returns null), it will just fall back to the default way. Me like!

I’m gonna build my own blog engine, because it’s never been done before, or maybe I can just do it better!

Today is the first day of my paternity leave, I’ll be home with my little daughter for at least six months. Which is great! But I immediately started to get the itch to write some code. I needed a hobby project. Since I suck at coming up with great ideas, I decided to be a good Jedi and build my own blog engine!

Yes, I know, there really is no need for another blog engine. Except that there is. The one I would like to use doesn’t seem to be out there. Also, it seems like a perfect way to try out some new technology that I’ve been wanting to use, without a client (or a manager) having opinions about it. And since I replaced the native comments of Subtext with Disqus a few weeks ago, I realized that there really aren’t that many features needed for a blog anymore.

So, my plan right now is to build it on ASP.NET MVC 3, with the Razor view engine. I’ve been wanting to try this whole NoSQL-thing for a while, so I’ll use RavenDB for persistence. I’ve also been wanting to try a distributed version control system (getting reeaaally tired of TFS!), so I’ll use Mercurial and host it on bitbucket. I’m sure I’ll think of other sweet stuff to use as well, and maybe I’ll change my mind on some of these along the way.

But now it’s on it’s way. I called the project “Alpha”, because that’s what it’ll always be. But I aim to replace Subtext with Alpha before the end of this year. And hopefully the process of building it will give me reasons to write some blog posts, since I will not be writing blog posts about the process of taking care of my daughter.

Anyway, the project is available at https://bitbucket.org/nahojd/alpha/overview. Not much to see yet, though.

Extension methods are teh shit!

I’m really starting to like extension methods! I must admit I was a bit sceptical at first when they appeared in C# 3.0 (wow, that was 3 years ago!). I was worried that they would make the code hard to follow, and thought that you could just make a static helper class instead (which is, after all, what extension methods really are).

1
2
3
4
5
//After all, what's wrong with this?
cleanString = StringHelper.RemoveHtml(htmlString);

//On the other hand, this does look nicer...
cleanString = htmlString.RemoveHtml();

So at first, I didn’t use it for much, but now I’ve really started to like it, and I find myself extract anything that operates on classes I can’t change to extension methods. For example, don’t you hate that you can’t use Action.ForEach on IEnumerable? Don’t worry, there’s an extension for that:

1
2
3
4
5
6
7
public static void ForEach<T>( this IEnumerable<T> enumeration, Action<T> action )
{
foreach (var item in enumeration)
{
action( item );
}
}

And the ugly !string.IsNullOrEmpty(someStringThatMayBeNullOrEmpty)? Well, how about

1
2
3
4
5
6
public static bool IsNullOrEmpty(this string @string, bool trim = false)
{
if (@string == null)
return true;
return String.IsNullOrEmpty(trim ? @string.Trim() : @string);
}

And suddenly you can call it like this instead: !someStringThatMayBeNullOrEmpty.IsNullOrEmpty(). And yes, this works even if the string is null, since you’re not actually calling a method on the string object, but rather a static method with the string as a parameter!

I’m also very fond of a generic extension that lets me parse strings to enums with an optional fall-back value if the string doesn’t parse: enumString.ParseToEnum<MyEnum>(MyEnum.DefaultValue). I expect that if this keeps up, all logic will be in extension methods by the end of the year.

For some reason, my colleagues thought that I went a bit to far with this one:

1
2
3
4
public static bool ContainsSomething( this string str )
{
return !str.IsNullOrEmpty();
}

But I think they’re just jealous.

Update: Fixed some bad formatting…